 Errors and Warnings tool (available on the top toolbar)
Please contact your Program Coordinator (PC) for further assistance.
 Form Editor. To use this feature, click on any parameter in blue
text, and the relevant sections of the Phase II Proposal
Instructions will then be displayed in a pop-up Help window.
Form Editor. To use this feature, click on any parameter in blue
text, and the relevant sections of the Phase II Proposal
Instructions will then be displayed in a pop-up Help window.
 (error) or a
 (warning). Errors are either missing information, incomplete or
illegal information, or a problem reported by the
Orbit or Visit Planner. There are four ways that diagnostics are
reported in APT.
Errors and Warnings tool (available on the top toolbar) in
marking incomplete or incorrectly specified values.
(warning). Errors are either missing information, incomplete or
illegal information, or a problem reported by the
Orbit or Visit Planner. There are four ways that diagnostics are
reported in APT.
Errors and Warnings tool (available on the top toolbar) in
marking incomplete or incorrectly specified values.
 Phase I ->
Phase II button in the toolbar.
You will be given an
option to copy your Phase I fixed target coordinates into your Phase
II proposal. The proposal will now appear in Phase II mode with
Phase I ->
Phase II button in the toolbar.
You will be given an
option to copy your Phase I fixed target coordinates into your Phase
II proposal. The proposal will now appear in Phase II mode with
 Proposal Information
and
Proposal Information
and  Targets
containers partially populated from
your Phase I, as well as empty
Targets
containers partially populated from
your Phase I, as well as empty
 Patterns
and
Patterns
and  Visits containers.
Those items marked with a
in with
the Form or Tree Editor are
either incomplete or have incorrect values. A finished proposal
should have no
(and few, if any,
) present on
any page or in the tree editor. The diagnostics may suggest what is
missing, but more information can be obtained by using the
 context-sensitive help.
 Proposal Description . Click on the
navigation button
below the form to go to the next form, the Proposal Description Form.
Alternatively, click on the Proposal Description element in the Tree
Editor. Fill in the requested information and click again on the
navigation button to go to the PI and CoI forms. This information
should be already filled in by APT (from your Phase I proposal). If
you wish to make changes to the investigators, please contact your
Program Coordinator.
Proposal Description . Click on the
navigation button
below the form to go to the next form, the Proposal Description Form.
Alternatively, click on the Proposal Description element in the Tree
Editor. Fill in the requested information and click again on the
navigation button to go to the PI and CoI forms. This information
should be already filled in by APT (from your Phase I proposal). If
you wish to make changes to the investigators, please contact your
Program Coordinator.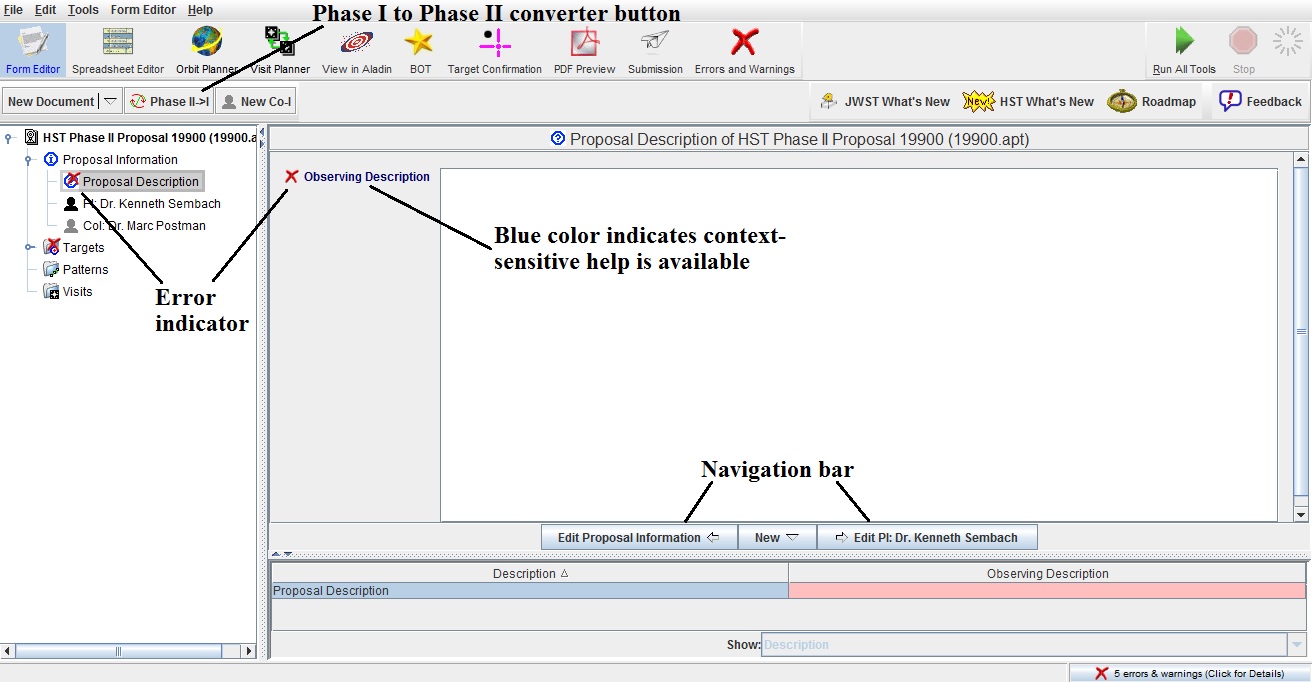
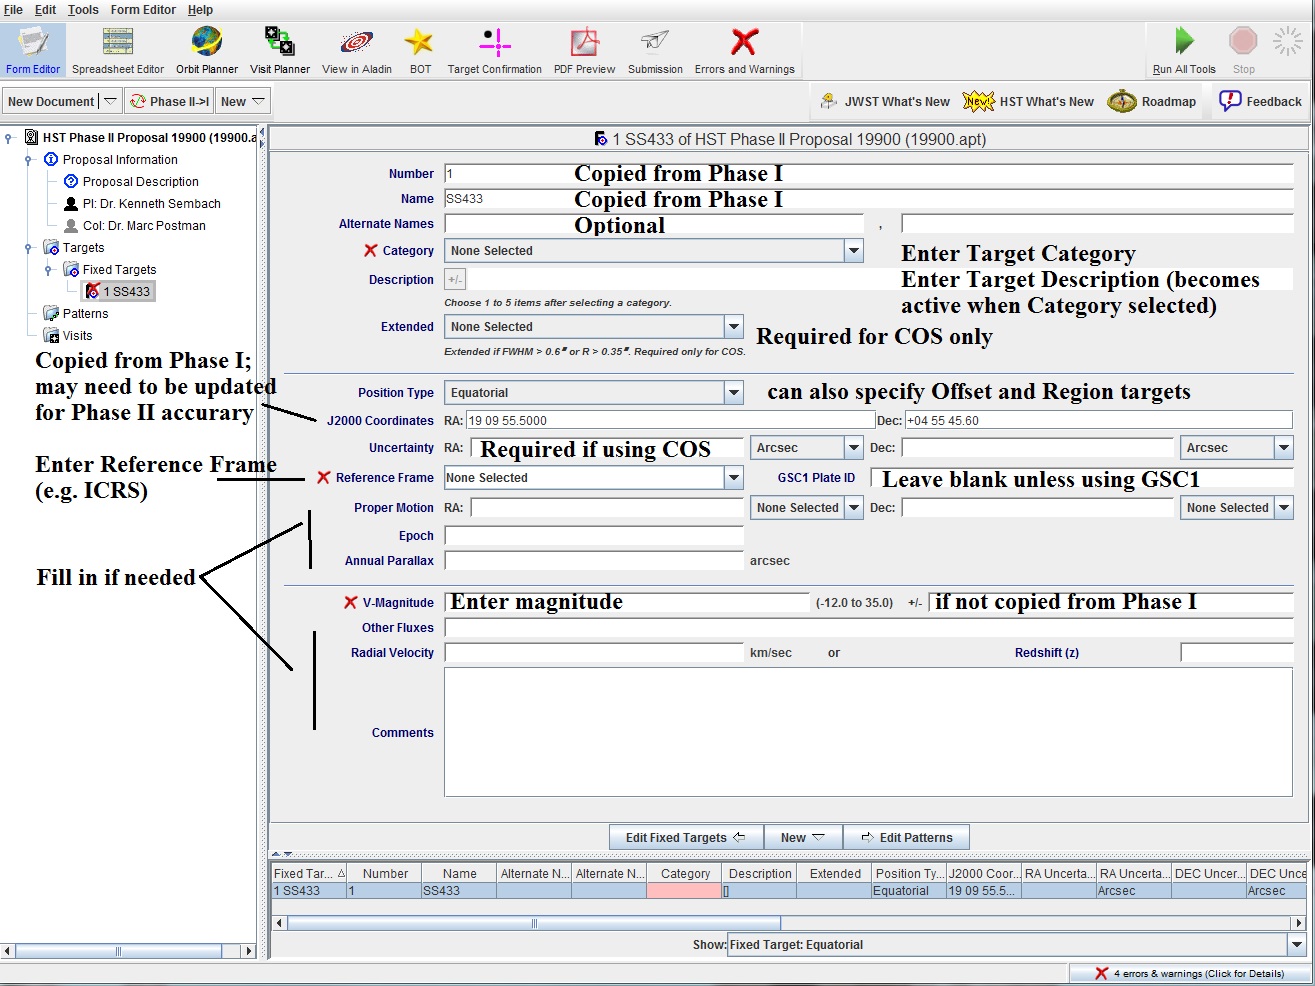
 Target Form. Continue to the Target
form by clicking on the
Edit Targets button in the navigation bar. All
targets in your Phase I proposal should appear in the Phase II
proposal, and if you chose, the fixed target coordinates should appear
as well. If additional
targets are needed, add the desired target by clicking
on the appropriate button in the toolbar. Click on the forward
navigation button on the lower right of the form, and input the
necessary information.
Target Form. Continue to the Target
form by clicking on the
Edit Targets button in the navigation bar. All
targets in your Phase I proposal should appear in the Phase II
proposal, and if you chose, the fixed target coordinates should appear
as well. If additional
targets are needed, add the desired target by clicking
on the appropriate button in the toolbar. Click on the forward
navigation button on the lower right of the form, and input the
necessary information.For your fixed target coordinates, the field labeled "Position type" determines the subsequent fields that you will edit - Equatorial, Offset, or Region; the default value is Equatorial. If your coordinates were copied from your Phase I proposal, and the accuracy is not sufficient for Phase II purposes, you should update your coordinates. If you are using COS, then you must fill in the coordinate uncertainties.
Also note that, as in Phase I, it is possible to import a
comma-separated list of targets directly into APT; see How to ingest
targets in Phase II for details.
Patterns by clicking on the Edit
Patterns navigation button below the form, and click on New Pattern
Specification. Select the pattern template desired, and change any
default value that is not appropriate for your science. These
templates will be referenced be exposures you create. See the Patterns
document
and movie
for more information.
 Visit form.
Create a new visit, and fill
out the appropriate information for the visit (i.e. the visit number
and any visit-level special requirements). Note that all date fields
take the format DD-MMM-YYYY (e.g. 01-Mar-2009) ;
these are converted to GMT. Depending on screen
size, it may be necessary to scroll left to see certain fields
(e.g. units on AFTER VISIT).
Visit form.
Create a new visit, and fill
out the appropriate information for the visit (i.e. the visit number
and any visit-level special requirements). Note that all date fields
take the format DD-MMM-YYYY (e.g. 01-Mar-2009) ;
these are converted to GMT. Depending on screen
size, it may be necessary to scroll left to see certain fields
(e.g. units on AFTER VISIT).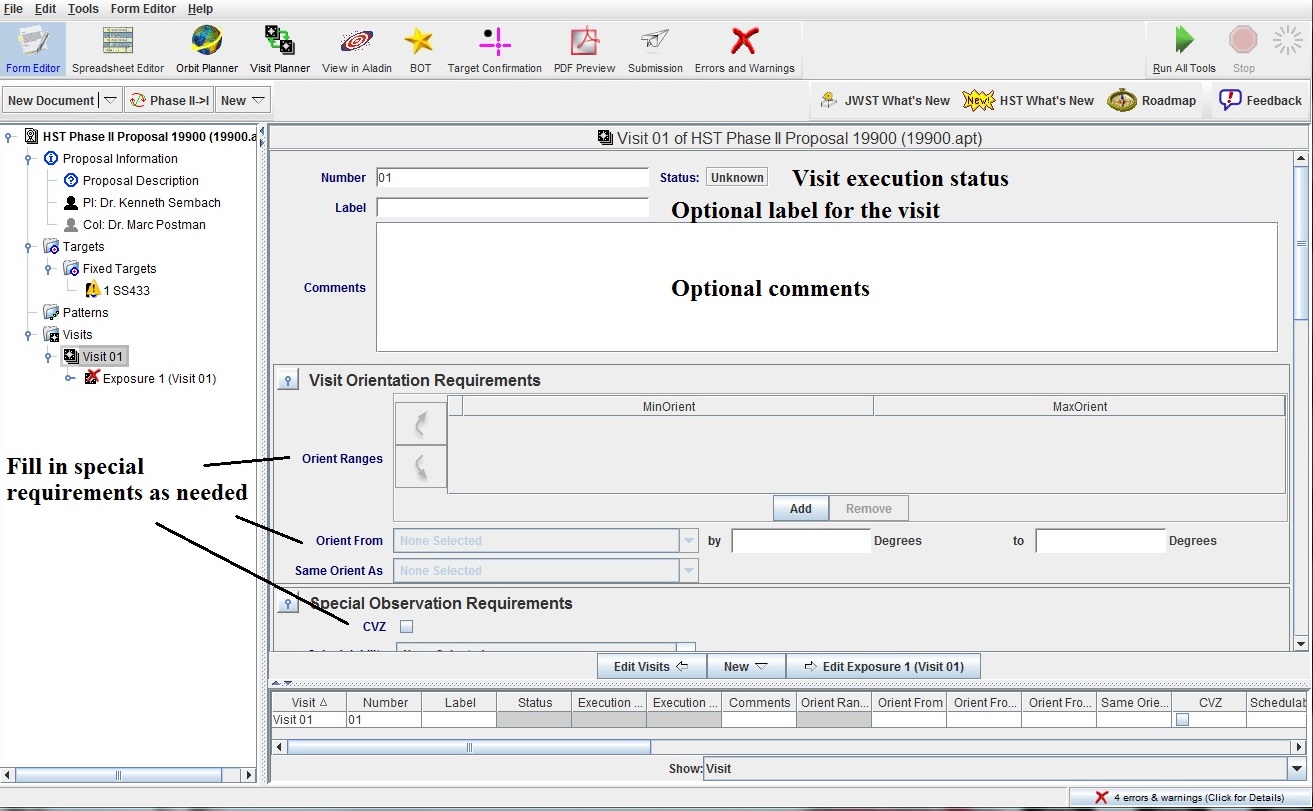
 Exposure form
and provide the requested
information there. Note that the Label field is optional, and is
simply a text field to allow you to label exposures (e.g. you may wish to
label the exposures in a Prime+Parallel Group with their instruments).
This label will appear in the Tree Editor. You should also enter any
optional parameters needed. There are no mandatory values (except
for WFC3/IR MULTIACCUM observations), and all values left unset
will use default values.
Exposure form
and provide the requested
information there. Note that the Label field is optional, and is
simply a text field to allow you to label exposures (e.g. you may wish to
label the exposures in a Prime+Parallel Group with their instruments).
This label will appear in the Tree Editor. You should also enter any
optional parameters needed. There are no mandatory values (except
for WFC3/IR MULTIACCUM observations), and all values left unset
will use default values.
The Adjusted Total Exposure Time tells you how much exposure time is represented by your exposure specification. For example, if the number of iterations is 2 and the exposure time is 1000s, then the adjusted total exposure time is 2000s.
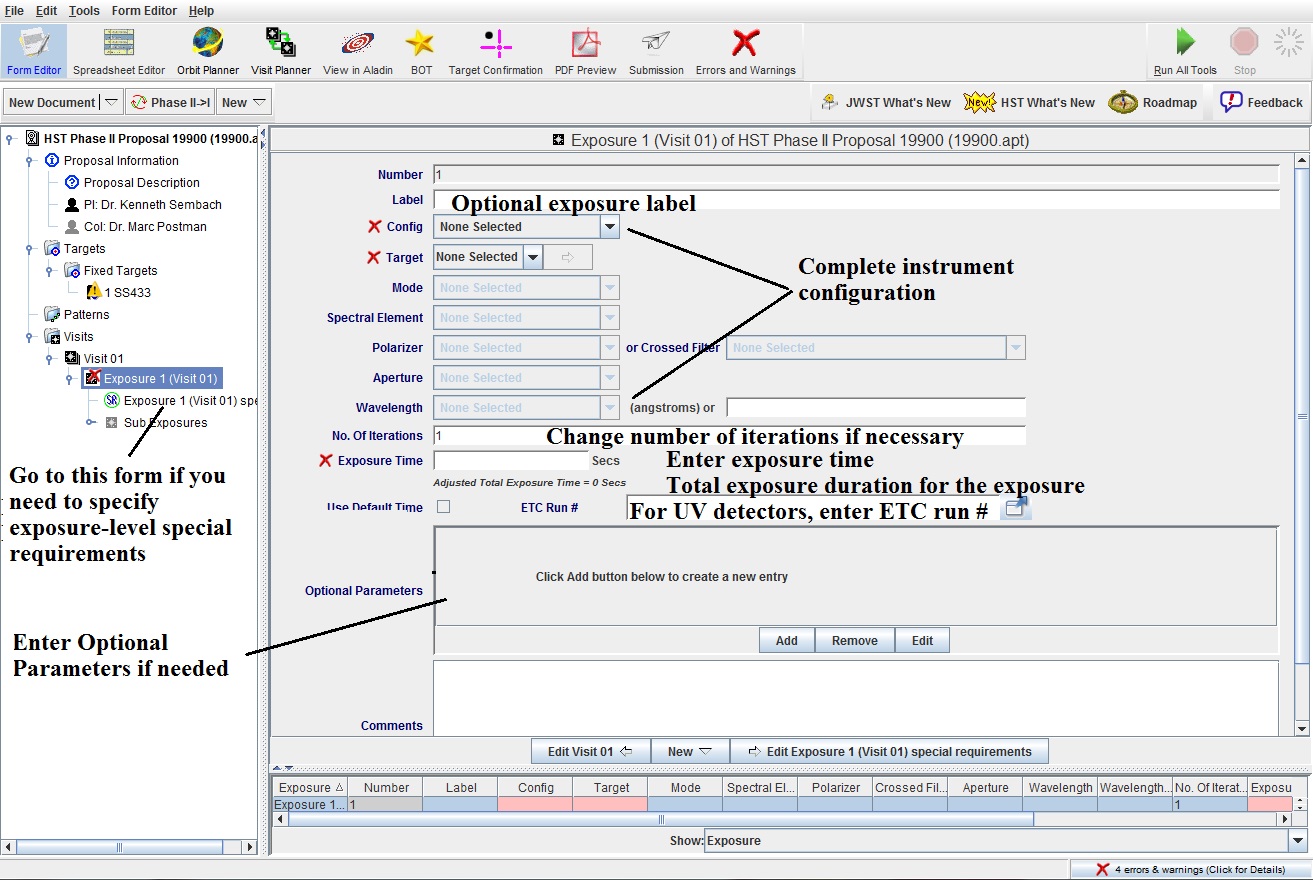
 Exposure-level special requirements
should be specified
next. These are organized by category as in the Phase II Proposal
Instructions. You should only enter values for those requirements
that you wish to specify; those parameters left as "None Selected"
will get the default values (documented in the Phase II Proposal
Instructions).
Exposure-level special requirements
should be specified
next. These are organized by category as in the Phase II Proposal
Instructions. You should only enter values for those requirements
that you wish to specify; those parameters left as "None Selected"
will get the default values (documented in the Phase II Proposal
Instructions).There is also a form for editing sub-exposures, but that step should be omitted at this point; see the Orbit Numbers document and movie for more information.
In APT, grouped exposures (exposure sequences, coordinated parallels,
and patterns) are placed in exposure containers, rather than being
linked with a special requirement. Note that containers can be placed
within containers (e.g. a coordinated parallel container in an
exposure sequence).
 Pattern container
and either drag/copy an existing exposure into it, or create a new
exposure in the container. See the Creating Patterns
document
and movie
for more information.
Pattern container
and either drag/copy an existing exposure into it, or create a new
exposure in the container. See the Creating Patterns
document
and movie
for more information. Exposure Sequence container and either drag/copy
existing exposures into it, or create new exposures in the container.
See the Creating Sequences
document
and movie .
for more information.
Exposure Sequence container and either drag/copy
existing exposures into it, or create new exposures in the container.
See the Creating Sequences
document
and movie .
for more information. Prime+Parallel container
and either drag/copy existing exposures into it, or create new
exposures in the container. See the Coordinated Parallels
document
and movie movie
for more information. Note that both the Prime and Parallel
exposures are placed in this container.
Prime+Parallel container
and either drag/copy existing exposures into it, or create new
exposures in the container. See the Coordinated Parallels
document
and movie movie
for more information. Note that both the Prime and Parallel
exposures are placed in this container.
 .
After all exposures are entered (or even
after a subset of exposures are entered), run the Orbit Planner on
your first visit. Pack the orbits to minimize unused orbital visibility. Note
that you may want to edit the sub-exposure properties of actual
duration and orbit number to do the packing (see next item below), or
use the Auto-Adjust feature.
See the Running the Orbit Planner
document and
movie , and
the Auto Adjust
document and
movie
for more information.
.
After all exposures are entered (or even
after a subset of exposures are entered), run the Orbit Planner on
your first visit. Pack the orbits to minimize unused orbital visibility. Note
that you may want to edit the sub-exposure properties of actual
duration and orbit number to do the packing (see next item below), or
use the Auto-Adjust feature.
See the Running the Orbit Planner
document and
movie , and
the Auto Adjust
document and
movie
for more information.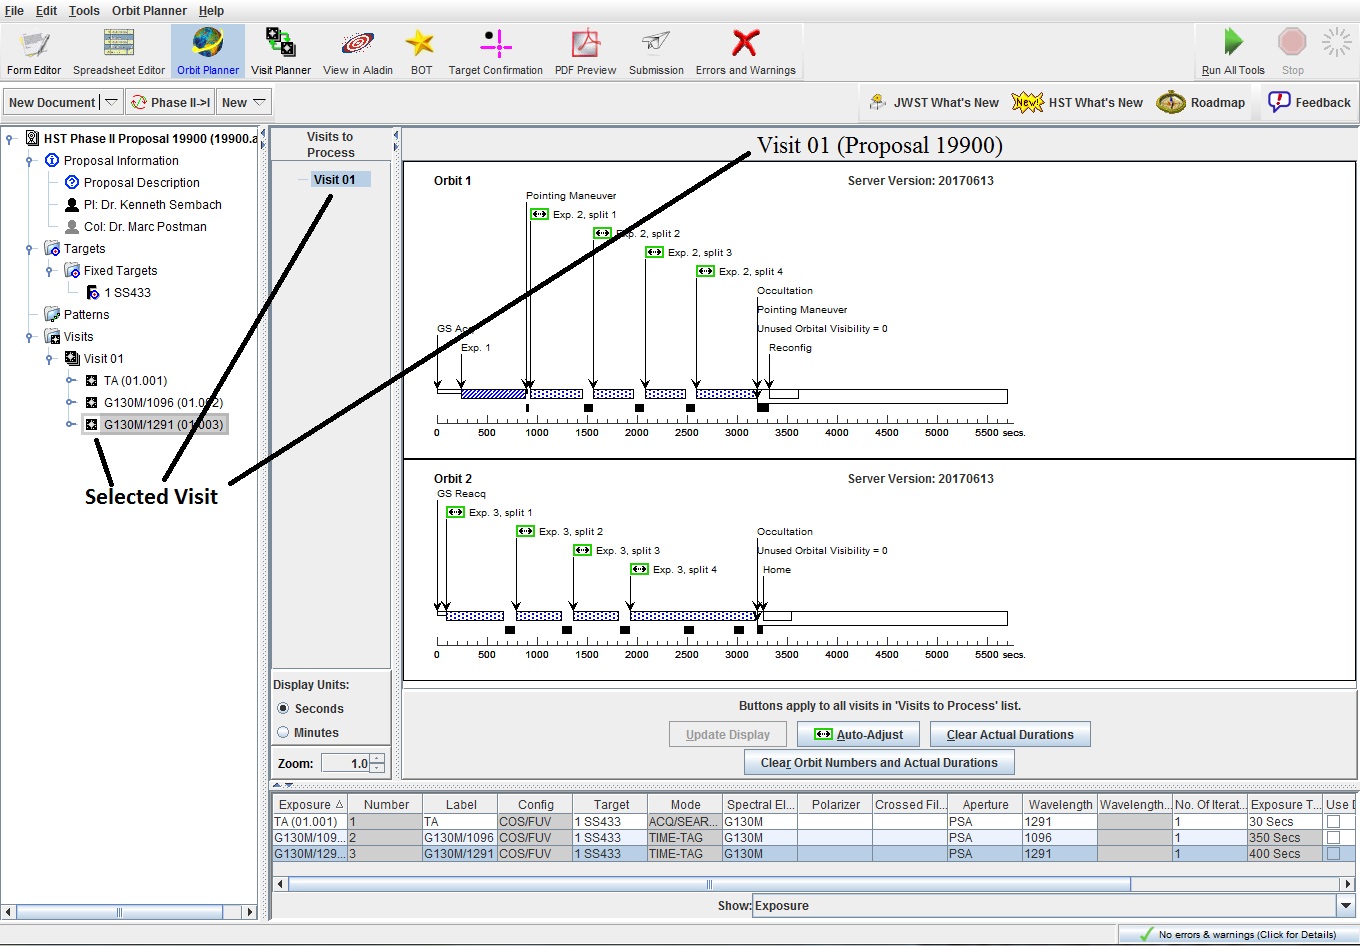
 Sub-exposures. To support the use of
orbit
numbers, and to allow for the manipulation of actual durations of
pieces of exposures (e.g. a piece of a CR-SPLIT), each exposure has
one or more
sub-exposure elements. A sub-exposure may correspond to a single
simple exposure, a piece of a CR-SPLIT exposure, each iteration of an
exposure with multiple iterations, or an exposure at a pattern
point. While each sub-exposure has the same basic properties of the
parent exposure (e.g., detector, operating mode, etc.), it contains
two properties that can be adjusted: the actual duration and the orbit
number. These parameters (particularly the orbit number) may need to
be edited when packing orbits. See the Orbit Number and Actual Durations
document
and movie
for more information.
Sub-exposures. To support the use of
orbit
numbers, and to allow for the manipulation of actual durations of
pieces of exposures (e.g. a piece of a CR-SPLIT), each exposure has
one or more
sub-exposure elements. A sub-exposure may correspond to a single
simple exposure, a piece of a CR-SPLIT exposure, each iteration of an
exposure with multiple iterations, or an exposure at a pattern
point. While each sub-exposure has the same basic properties of the
parent exposure (e.g., detector, operating mode, etc.), it contains
two properties that can be adjusted: the actual duration and the orbit
number. These parameters (particularly the orbit number) may need to
be edited when packing orbits. See the Orbit Number and Actual Durations
document
and movie
for more information.
 Visit Planner. Now run the Visit
Planner and adjust
parameters to increase schedulability, if necessary. See the Visit Planner
document and
movie
for more information.
Visit Planner. Now run the Visit
Planner and adjust
parameters to increase schedulability, if necessary. See the Visit Planner
document and
movie
for more information.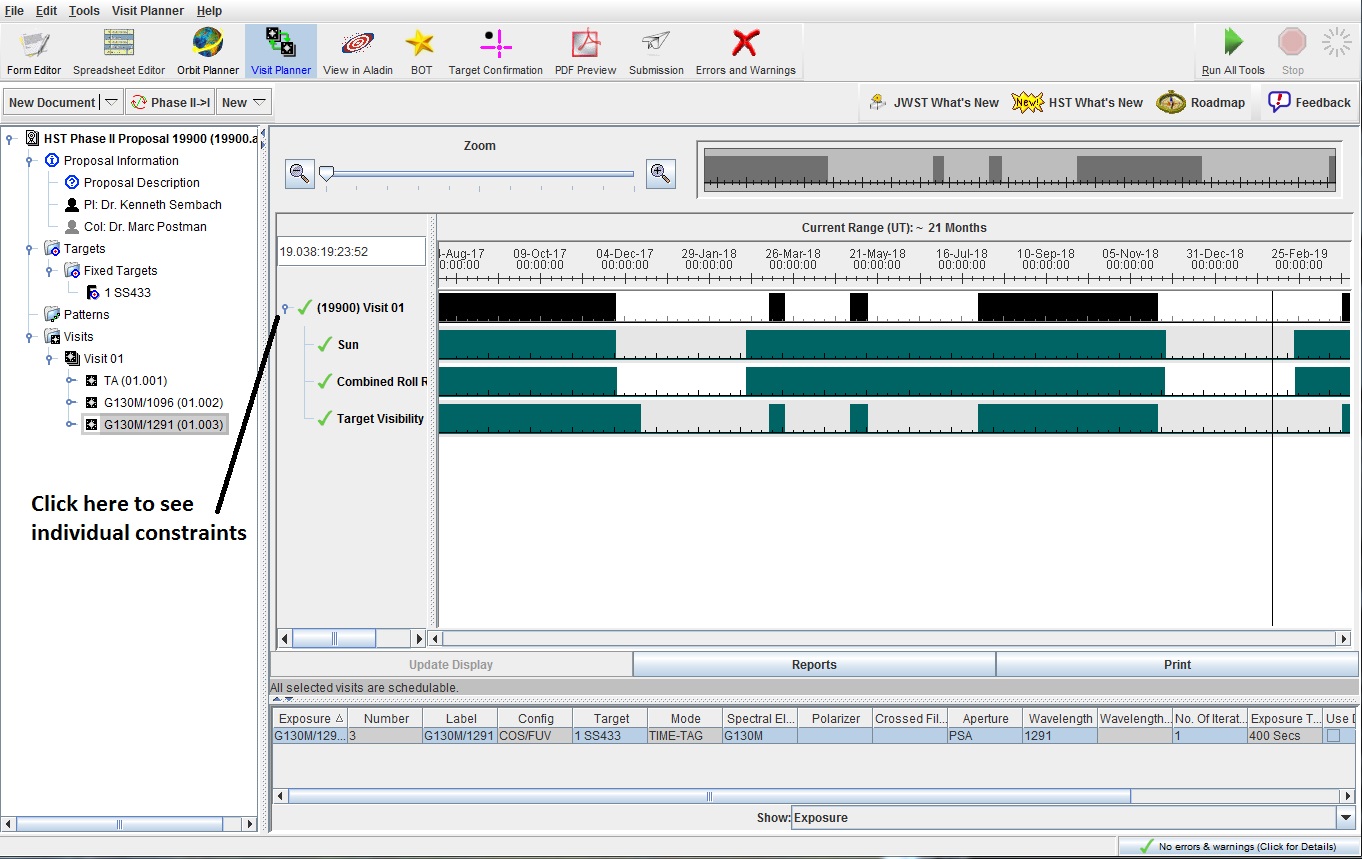
 PDF
Preview tool. See the documention on
Understanding the
Phase II PDF Proposal Preview .
PDF
Preview tool. See the documention on
Understanding the
Phase II PDF Proposal Preview .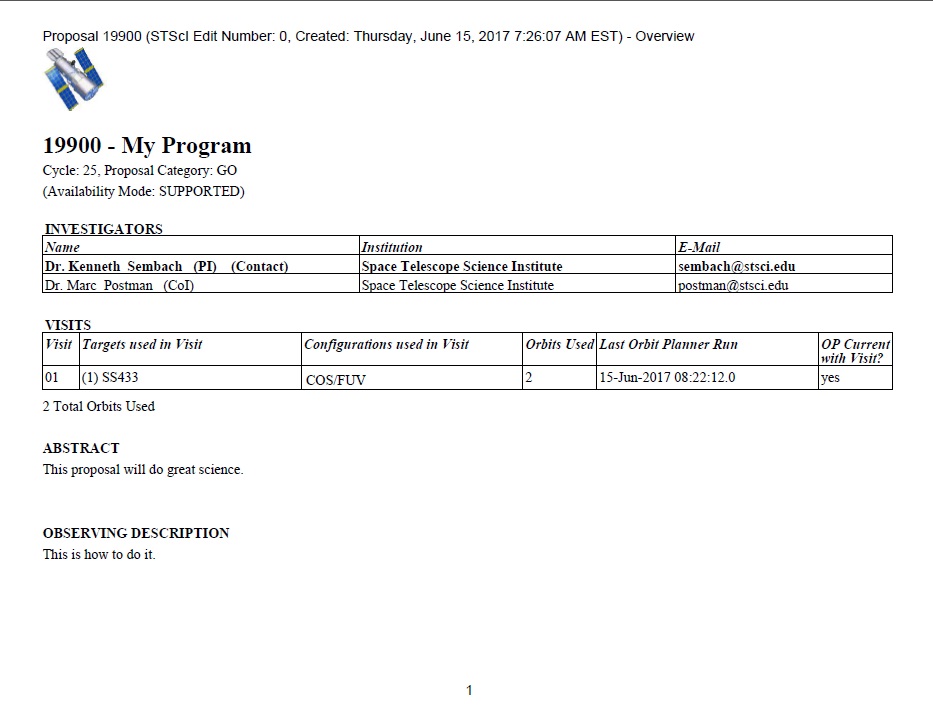
 chart
tool to verify the positions of
your fixed targets. Note that if proper motion values have been supplied,
the tools will take them into account. See the Target Confirmation chart
document and
movie
for more information.
chart
tool to verify the positions of
your fixed targets. Note that if proper motion values have been supplied,
the tools will take them into account. See the Target Confirmation chart
document and
movie
for more information.
PDF Preview tool. Submit tool,
type in any comments, and click on Submit Phase II
Submit tool,
type in any comments, and click on Submit Phase II