 Exposure Sequences.
 Orbit Planner (click here
to see the movie)
is the tool that allows packing exposures into
orbits. The tool will allow you see how your exposures will be placed
in each orbit, and allow you to manipulate the exposures to place them
in the order and orbit you desire.
Orbit Planner (click here
to see the movie)
is the tool that allows packing exposures into
orbits. The tool will allow you see how your exposures will be placed
in each orbit, and allow you to manipulate the exposures to place them
in the order and orbit you desire.
Note that this tool is for planning purposes only, and while your
exposures will execute in the order you specify, there is no guarantee
that your exposures will occur in the orbits you specify (e.g.
exposures may be shifted depending on when it is actually scheduled).
If you need exposures to occur without gaps (due to
occultations or SAA passages), you need to use the Exposure Sequence
capability, which will force the exposures to occur without interruption;
see separate documentation
and
movie
on creating
Exposure Sequences.
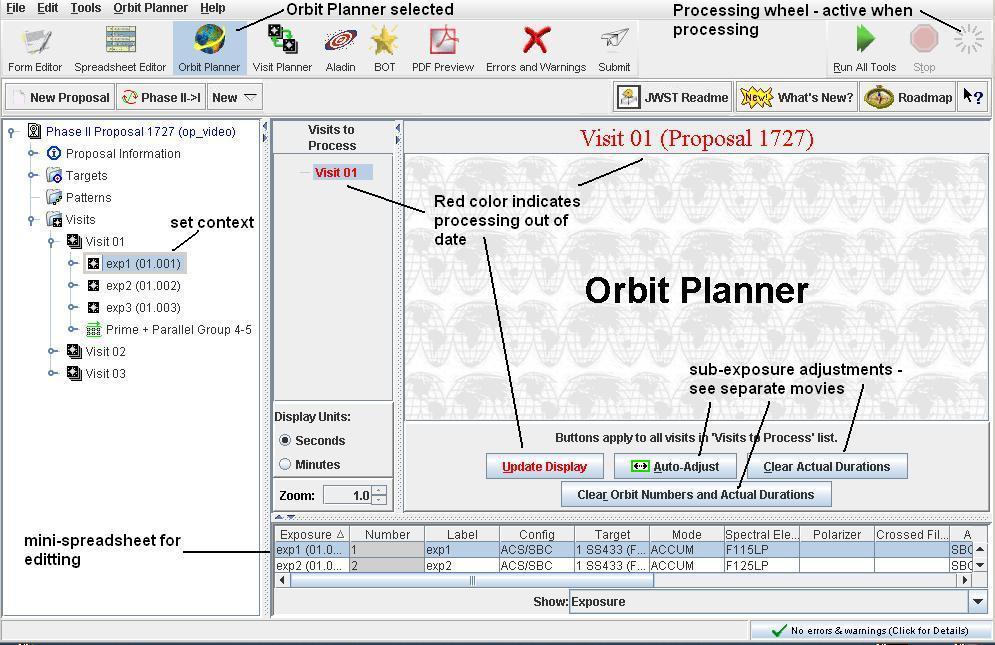
Before initiating the
Orbit Planner, you should select the visit(s)
you wish to process; note that there is a
 Run All Tools button that
will process multiple visits through all tools in a batch run. You
can select your visit(s) by either selecting the
Run All Tools button that
will process multiple visits through all tools in a batch run. You
can select your visit(s) by either selecting the
 Visit
container or any
Visit
container or any
 exposure in the visit in the Hierarchical (Tree) Editor; selecting
the
exposure in the visit in the Hierarchical (Tree) Editor; selecting
the  Visits container will select all visits in the proposal for
processing. Then select the
Orbit Planner button at the top of the
display, which will initialize the tool. Note that the title is in
red, and that the Update Display button is active (and red) - this
indicates that the display is out of date. There is also a
mini-spreadsheet available for editing exposure attributes without
toggling to the
Visits container will select all visits in the proposal for
processing. Then select the
Orbit Planner button at the top of the
display, which will initialize the tool. Note that the title is in
red, and that the Update Display button is active (and red) - this
indicates that the display is out of date. There is also a
mini-spreadsheet available for editing exposure attributes without
toggling to the
 Form Editor.
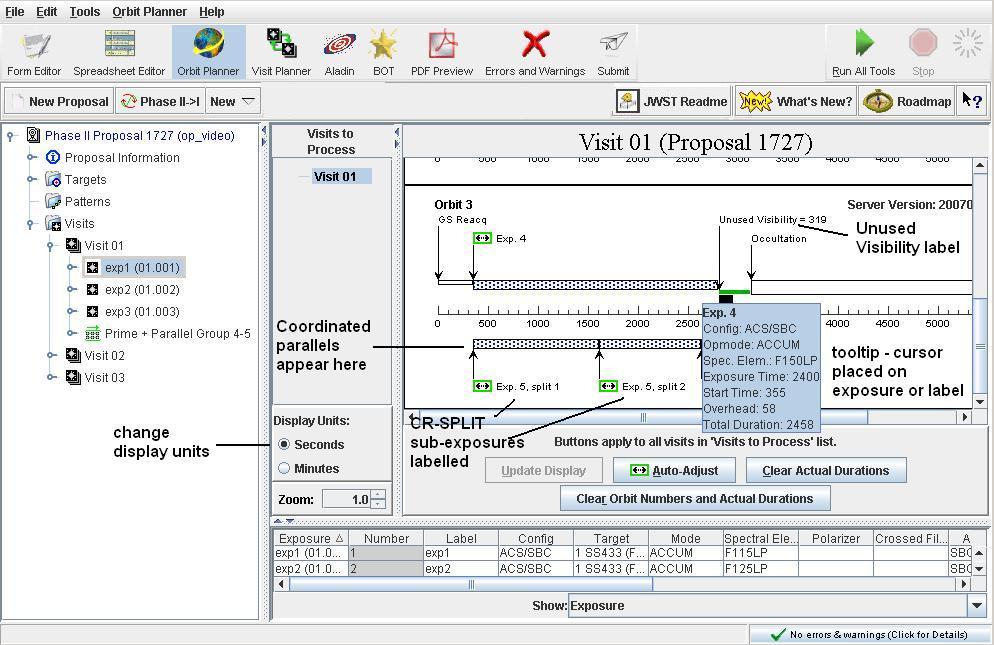
 Progress Wheel spins. When complete, the orbit
structure is displayed. The title is now shown in black, and the
Update Display button is inactive - this indicates that the display is
now up-to-date. If multiple visits were processed, select the visit you
want to see in the Visits to Process area.
Progress Wheel spins. When complete, the orbit
structure is displayed. The title is now shown in black, and the
Update Display button is inactive - this indicates that the display is
now up-to-date. If multiple visits were processed, select the visit you
want to see in the Visits to Process area.
 Orbit Planner
rerun. Note that multiple changes can be made before updating in the
Orbit Planner.
Orbit Planner
rerun. Note that multiple changes can be made before updating in the
Orbit Planner.
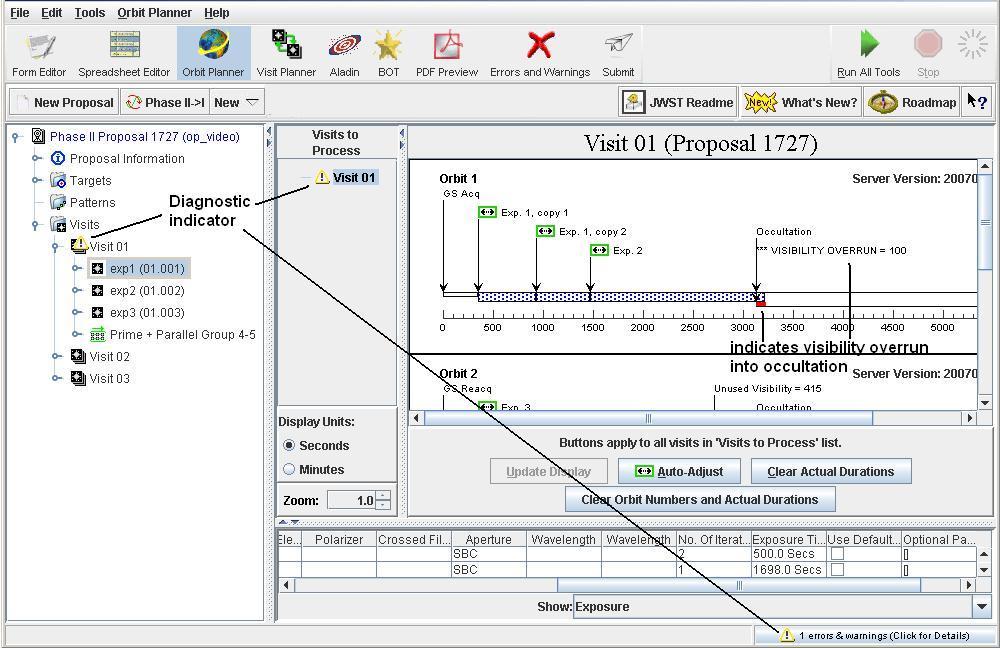
If we now subtract 100s from Exp 2 and rerun the
Orbit Planner, there
is now no unused orbital visibility.

Note that the overhead time for some exposures is a function of the
exposure time (e.g. as the exposure time is reduced, so is the
overhead time), which could result in remaining unused orbital visibility.
It is possible to iterate further to attempt to fully
pack the orbit, but since the orbit is approximate (i.e. the true orbital
visibility of your target depends on exactly when it is observed,
whereas the orbital visibility used in APT is an average value), it is not
worth any effort to pack the last couple of seconds.
A second way to pack your orbits is to use the Auto-Adjust capability (see separate documentation and movie for more information on this concept). With Auto-Adjust, you select the sub-exposures in each orbit that you wish to expand, and APT will divide the Unused Orbital Visibility equally among those sub-exposures.