Visual Target Tuner Regression Test Plan
This test is designed to verify the features of the Visual Target Tuner (VTT) in standalone mode. This document contains a set of features to be tested followed by a test plan that verifies each feature.
Topics to test include:
- Retrieving Images
- Manipulating Images
- Create/Edit Observations
- Manipulation of Display over Image
- Observation Orientation
- File Exporting/Saving
- Displaying Additional Information/Help Files
- Miscellaneous
Written by:
Karla Peterson
Patrick McCauley
Contributions by:
Rusty Whitman
Last Modified:
2/16/2004
Features
- Retrieve images
- Retrieve a FITS image from a DSS survey
- Choose the size of a DSS image
- Choose a FITS image from the NED archive
- Choose a FITS image from local disk
- Retrieve additional image(s) to layer
- Retrieve
many DSS images in batch to local disk
- Manipulate display of images
- Close all image(s)
- Close one of layered images
- Change which image layer is on top
- Change the Opacity of an image layer
- Change whether an image layer is visible
- Move around the image if the entire image is not displayed
- Zoom in and out, and reset zoom
- Toggle negative/positive of image
- Control
image colors and cut levels
- Create and manipulate observations
- Choose an aperture for an observation
- Change observation to use a different aperture
- Change default pointing
- Centroid on an object to change pointing
- Add additional pointings
- Change which observation(s) are currently selected
- Group observations for translation and rotation together
- Delete
an observation
- Manipulation of display over image
- Move/Rotate the aperture
- Toggle whether aperture fiducial points are displayed
- Toggle whether observation labels are displayed
- Toggle whether aperture circles are displayed
- Toggle whether RA/DEC grid lines are displayed
- Toggle whether other apertures are displayed
- Choose which apertures are displayed in FOV
- Toggle whether the default object catalog is displayed
- Change which catalog(s) to overlay
- Filter objects displayed from catalog by magnitude
- Filter objects displayed from catalog by object type
- Change type of labels for cataloged objects (name, magnitude, type, no label, position uncertainty)
- Change the colors of individual catalogs
- Toggle whether to display calculated legal orients
- Select observation orientation(s)
- Choose legal orientation range
- Define
legal orients by tagging display
- File Exporting/Saving
- Save a session
- Retrieve a session
- Save in RPS2 syntax
- Save and retrieve an image as a FITS File
- Save an image layer as a FITS File
- Save a Screen Snapshot (JPEG/current view, JPEG/entire image, GIF/current view, GIF/entire image
- Print display
- Preview
print of display
- Displaying Additional Information/Help Files
- Get more information from catalog for an object
- See the header info for the FITS image
- Get RA/DEC of a cursor position
- Get pixel coordinates of cursor position
- Get raw brightness value at cursor position
- Do Bright Object query
- Do a StarView query
- Radial profile plot
- Memory Monitor
- Log Console
- Literature search from ADS Abstracts
- Literature search from ADC IMPReSS
- Literature search from NED Search
- Tool tips
- Context sensitive help
- Help files
- Information
about the release
- Miscellaneous
- Manipulate text (Cut, Copy, Paste, Select All)
- Check on or stop a retrieval
- Change the default directory
- Change the default color of the aperture
- Change the size of the centroid area
- Change the size of the area plotted in the radial profile
- Change the default image database
- Change the default overlay catalog
Testing Scenario
Unless otherwise stated it is assumed that the APT software has been properly installed on the test platform, a functioning network connection exists, and the required servers are operational. It is also assumed that the VTT preferences are set to specify the GSC as the default Catalog, the DSS as the default image database, and to display the cursor pixel position, data value, and coordinates in the status bar.
Note: An asterisk (*) following the test indicates a screenshot is available at the end of the document.
|
Test
to perform |
Input |
Expected
output |
Features
Verified |
|
|
1.
Select an Image using the menu option (TargetSelect -> Select Image),
and set image size to be 45x45 arcminutes (Use HST Phase 2 DSS) |
Object
Name: M51 |
M51
is loaded |
1A,
1B |
|
|
2.
After maximizing the window, move around the image to each of the
four corners |
|
|
2F |
|
|
3.
Turn on the default catalog * |
GSC |
Guide
stars displayed |
4H |
|
|
4.
Change catalog labels to Type and Magnitude, then back to Name |
Type,
Magnitude |
Catalog
labels will change as different options are selected |
4L |
|
|
5.
Filter out catalog objects of faint magnitude (turn off the magnitude
limiting option when finished) |
Magnitude
<= 11 |
7
stars in entire image |
4J |
|
|
6.
Open the Catalog Table View.
Select a few guidestars to ensure they change color to the Callout
Color. Save the catalog objects to a
file. |
|
|
|
|
|
7.
Overlay another catalog |
SIMBAD |
New
items appear |
4I |
|
|
8.
Change the color of the new catalog (under Layers) |
Change
SIMBAD to blue |
SIMBAD
items are blue |
4M |
|
|
9.
Click on an object to get more information (filter out everything
except supernovae) * |
SN
1994I |
Yellow
box with information (Type, RA, dec, etc) |
7A,
4K |
|
|
10.
Search ADS for abstracts from Object Details. Turn off catalog when finished. |
SN
1994I |
50+
abstracts |
7K |
|
|
11.
Search for literature from ADC IMPReSS |
|
RA:
13 29 52.42, dec: +47 11 39.8 |
7L |
|
|
12.
Search for literature from NED Search |
“NED
Near Position” |
116
objects |
7M |
|
|
13.
Zoom in, out, default (Reset view) |
|
|
2G |
|
|
14.
Change image color |
Colormap:
Green, Intensity: Jigsaw |
Black/green
image |
2I |
|
|
15.
Change cut level * |
12000,
15000 |
All
dim objects disappear, galaxy becomes pronounced |
2I |
|
|
16.
Change cut level back to normal |
Median
filter |
6289,
22291 |
|
|
|
17.
Change image color back to normal |
Colormap:
Ramp, Intensity: Negative |
|
|
|
|
18.
View the FITS file information from Image Tools window |
|
Plate
ID: 008S |
7B |
|
|
19.
Select the aperture |
WFPC2/PC1 |
Aperture
displayed |
3A |
|
|
20.
Toggle negative, exposure, fiducial, labels, circles, targets and
grid |
|
|
4B,
4C, 4D, 4E, 2H |
|
|
21.
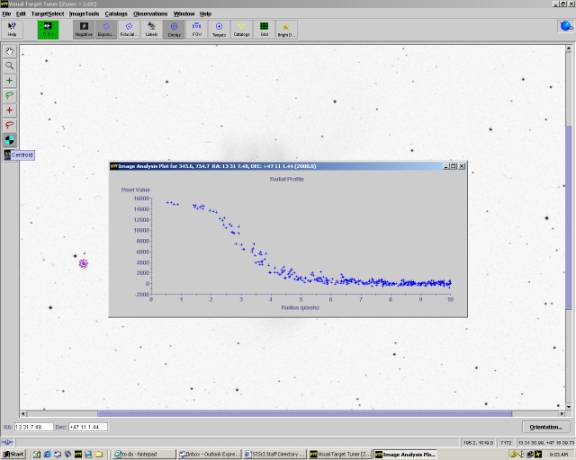
Do a radial plot profile (from Image Tools menu) * |
Radius:
10 |
Points
scattered linearly around 2000-4000 |
7H |
|
|
22.
Save Session, select “save FITS file locally” |
|
.vtt
file, .fits file |
6A,
6D |
|
|
23.
Exit VTT, then restart VTT |
|
|
|
|
|
24.
Retrieve the saved session |
|
|
6B,
6D |
|
|
25.
Import the guide stars saved previously. |
|
|
|
|
|
26.
Specify orientation angle |
30
degrees |
|
5A |
|
|
27.
Move/rotate aperture |
|
|
4A,
3C |
|
|
28.
Change the aperture and reset orientation angle to zero. |
STIS/FUV/ 25MAMA |
|
3B |
|
|
29.
Turn on FOV |
|
FOV
displayed |
4F |
|
|
30.
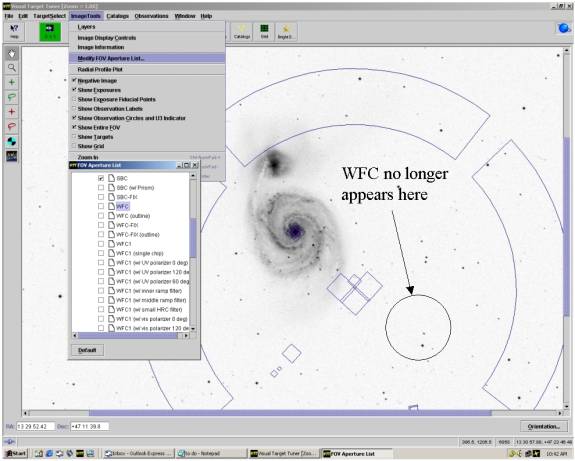
Modify FOV Aperture List.
Turn off FOV after verifying changes occurred. * |
Deselect
HST/ACS/WFC |
Aperture
removed from FOV display |
4G |
|
|
31.
Add an observation |
HST/ACS/WFC |
|
3E |
|
|
32.
Move the first observation to another region of the image. |
Switch
to STIS observation and drag it to M51’s companion galaxy |
|
3F |
|
|
33.
Add orientation constraints: ·
Orientation that wraps around zero (e.g. 330 – 30) ·
Orientation that overlaps an existing orientation ·
New orientation that shares a border with an existing orientation ·
Exact orientation (e.g. 90 – 90) |
|
|
|
|
|
34.
Select both apertures, then move/rotate them |
|
Apertures
rotate around individual centers |
|
|
|
35.
Group the two apertures, then move/rotate them |
|
Apertures
rotate around common center |
3G |
|
|
36.
Ungroup the selected observations and delete the original one |
Delete
the STIS observation |
STIS
observation is removed |
3H |
|
|
37.
Move the cursor around to verify that RA/Dec, pixel value, and
brightness value are changing |
Pixel
746.5, 949.5 |
Count:
21175, RA: 13 29 59.38, Dec: +47 16 6.35 |
7C,
7D, 7E |
|
|
38.
Save file in RPS2 Format |
|
|
6C |
|
|
39.
Save a Screen Snapshot (JPEG/current view, JPEG/entire image,
GIF/current view, GIF/entire image |
|
|
6F |
|
|
40.
View a print preview |
|
|
6H |
|
|
41.
Print display |
|
|
6G |
|
|
42.
Close all images, then close/restart VTT |
|
|
2A |
|
|
43.
Select Image from the NED database (via Search for Object Position) |
Object:
M51, first image (in band 103aE) |
Image
of M51 |
1C |
|
|
44.
While opening the file, check on its status |
|
|
8B |
|
|
45.
Open a saved image (may need to extend view if prompted) |
M51
(the one saved in Step 21) |
|
1D,
1E |
|
|
46.
Check the memory monitor (run GC to reduce memory allocated) |
|
|
7I |
|
|
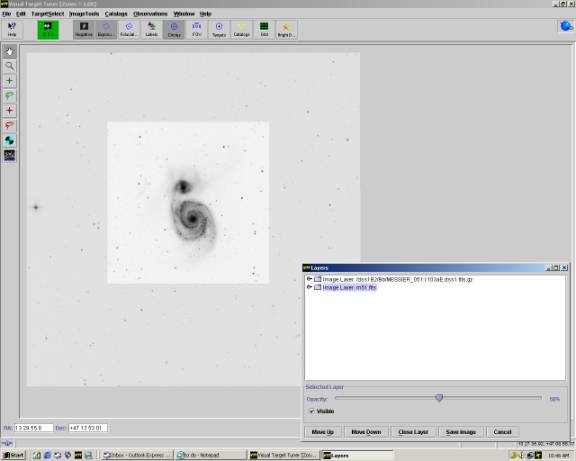
47.
Change the opacity of the second image (local image) * |
Change
to approximately 50% |
Larger
image fades |
2D |
|
|
48.
Move the second layer (local image) up |
|
Galaxy
gets slightly darker |
2C |
|
|
49.
Make the first layer (local image) invisible |
|
Smaller
image disappears |
2E |
|
|
50.
Save the bottom (NED) layer |
|
|
6E |
|
|
51.
Close the bottom (NED) layer |
|
|
2B |
|
|
52.
Mark the top layer visible and increase opacity to 100% |
|
|
2E |
|
|
53.
Add an observation |
STIS/FUV/ 25MAMA |
|
|
|
|
54.
Use the Centroid Tool * |
GS
3463-58 |
Radial
profile decreasing as radius increases |
3D,
7H |
|
|
55.
Use the Bright Object Tool |
Exp
Time: 10000 Spec
El: G140L |
6
safe, 5 that could not be checked |
7F |
|
|
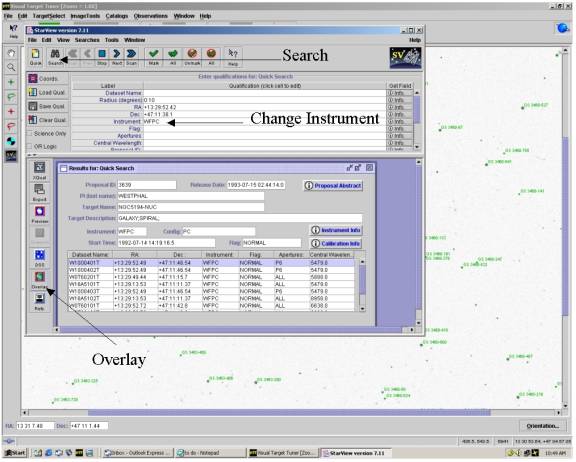
56.
Use the StarView Tool to overlay a previous observation * |
Click
center of M51, Instrument:
WFPC, Obs: W1000401T |
WFPC
overlaid across M51 |
7G |
|
|
57.
Check the log console |
|
|
7J |
|
|
58.
Verify the release information |
|
|
7Q |
|
|
59.
Browse through the help files |
|
|
7P |
|
|
60.
Close VTT |
|
|
|
|
|
61.
Retrieve images from a batch file (done at the command prompt) |
Batch
File: M51,
30.0, 30.0 M101,
15.0, 15.0 NGC
7741, 4.9, 7.3 13
31 17.42, +47 24 28.56 |
|
1F |
|
|
62.
Confirm that batch file successfully retrieved images |
|
|
1F |
|
|
63.
Change the default directory |
|
|
8C |
|
|
64.
Change the aperture color |
Orange |
|
8D |
|
|
65.
Change the centroid radius |
Centroid:
5, Plot: 15 |
|
8E,
8F |
|
|
66.
Change the default image database |
ESO
DSS |
|
8G |
|
|
67.
Change the default overlay catalog |
SIMBAD |
|
8H |
|
|
68.
Rerun 1-3, 52, 53, 21 to ensure changes took effect |
|
|
8C,
8D, 8E, 8F, 8G, 8H |
|
|
Verify that tool tips work correctly |
|
|
7N |
|
|
Verify that context sensitive help works correctly |
|
|
7O |
|
|
Verify cut, copy, paste, select all work |
|
|
8A |
|
Screenshots
This section contains screenshots that correspond to the Testing Scenario. The screenshots show what the user should get after completion of the associated step.
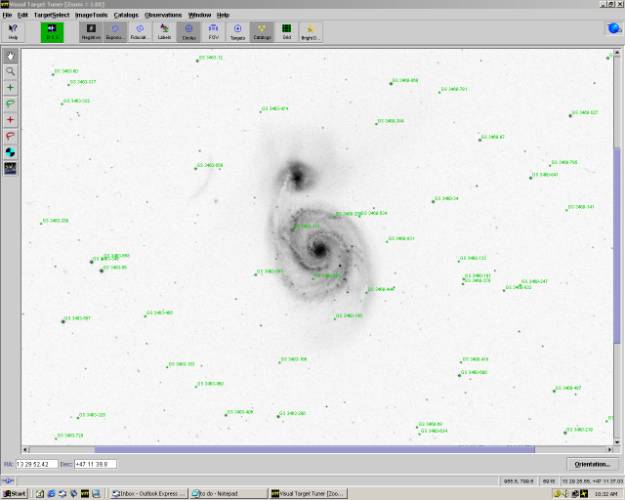
Guide Star Catalog
(Step 3)
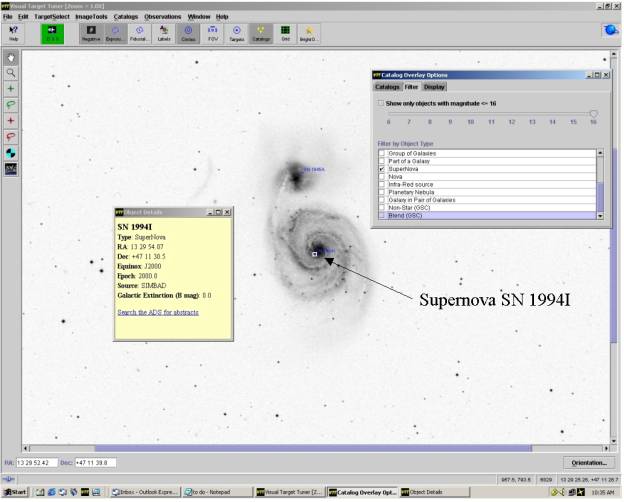
More Information for an object, SN 1994I
(Step 8)
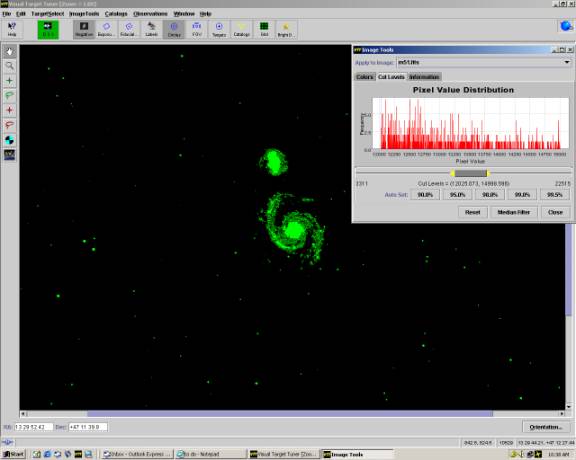
The Image after Cut Levels/Color Modification
(Step 14)
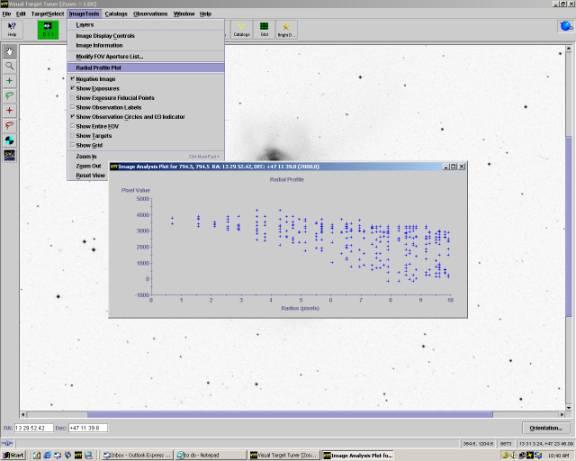
Radial Plot Profile of M51
(Step 20)
FOV after modification (hide ACS/WFC)
(Step 30)
View of two overlapping images
(Step 46)
Radial Plot Profile of GS-3463-58
(Step 53)
StarView Window
(Step 55)