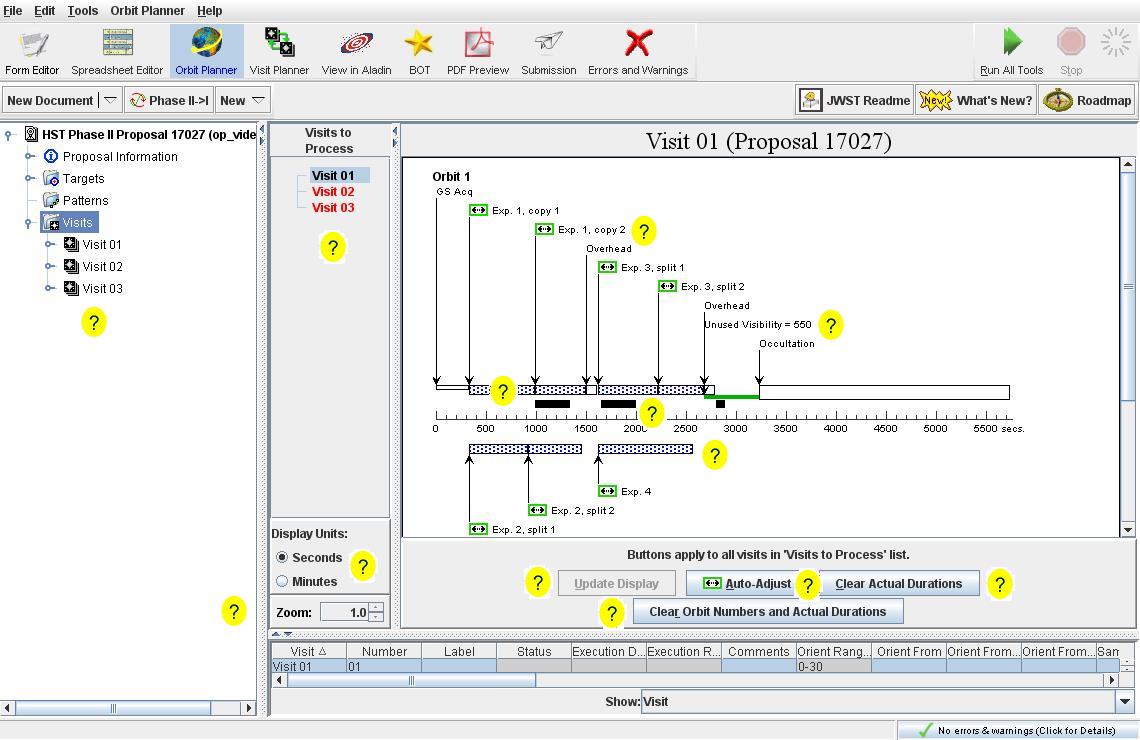
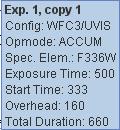
To get more information (tooltip), put your cursor on the
 .
.
To get a pastable version of the tooltips, click on the
 .
.
(Unfortunately these do not work with the using Safari or Omniweb browsers.)

Visits to Process
This area shows which visits will be processed by the Orbit Planner.
Those visits in BLACK have not changed since the last run of the Orbit
Planner, and therefore do not need any processing. Those visits in
RED have changed since the last Orbit
Planner run, and will be processed. To view the Orbit Planner
results, select the visit of interest in this area. Note that if only
1 visit is listed, the Orbit Planner display will automatically show
the results for that visit.
Set Context
Before initiating the Orbit Planner, you need to select the visit or
visits you want to process. To do this, select the visit(s) in the
Hierarchical (Tree) Editor by either clicking the Visit container, or
clicking on any exposure in the Visit. Note that if you select the
Visits container, all visits will be selected. When you go to the
Orbit Planner, you will see the selected visits in the Visits to
Process area.
Update Display
To process the visit(s), hit the Update Display button. If the
visit(s) are out of date (and hence in need of processing), this
button will be active and RED.
If the visit(s) are all current, this
button will be inactive (and greyed out). During processing, the main
display area of the Orbit Planner is greyed out, and the spinning
flower (upper right) is active.
Zoom
To change the magnification of the Orbit Planner display, select the
magnification factor at the right. This
function is particularly useful if you have many short exposures.
Exposure
Each exposure is shown in the timeline. Different colors and shadings
are used to indicate different types of exposures.

Placing the cursor on the exposure (or the exposure label) will bring up a
tool-tip providing the details of the exposure (including overheads).

Exposure Label
Placing the cursor on the exposure label (or the exposure) will bring
up a tool-tip providing the details of the exposure (including
overheads).

If the

symbol is next to the label, the exposure may be adjusted using the
auto-adjust function.
Unused Visibility
This shows the amount of unused orbital visibility in the orbit. You can
adjust the exposure times of your observations (either manually or
with the Auto-Adjust function) to reduce this time (ideally to zero).
Note, however, that instrument overheads and/or exposure time
quanitization (WFC3/IR) may limit your ability to use all the time in an
orbit. However, since the orbital visibility time shown is an average value
(the visibility for the actual orbit used may be slightly longer or
slightly shorter), reducing unused orbital visibilities of less than ~15
seconds is not really useful.
Buffer Dumps
The black bars show when the buffer dumps will occur during the orbit.
Placing the cursor on the bars will bring up a tool-tip showing the
start time and duration of the dump.
Parallel Observations
Coordinated parallel observations
are displayed beneath the timeline. The details of the
exposures are available from a tool-tip, just as for the prime observations.
Display Units
Select the units (seconds or minutes) that you wish the Orbit Planner
timeline to be displayed in. Note that the exposure times in the
tool-tips will change to make the graphical display.
Auto Adjust
Initiate the Auto-Adjust function. This function (see the training movie
for details) will use the selected sub-exposures (or all sub-exposures in
none are selected) to fill each orbit in the visit in an automated
fashion. The unused orbital visibility in each orbit is equally divided (as
much as possible given instrument constraints) amongst the selected
sub-exposures. The function, which takes changing instrument overheads
(if applicable) into account, will iterate until less than 10 seconds
of unused orbital visibility remains in each orbit. The revised exposure times
will appear in the Actual Duration field in the Sub Exposures folder,
and will NOT be reflected in the Exposure time keyword of the exposure.
Clear Orbit Numbers and Actual Durations
Clear the Orbit Numbers and Actual Durations for all exposures in the
proposal and reprocess the visit. For more on sub-exposures and the
Orbit Number/Actual Duration fields, see the training movie on
Sub-exposures.
Clear Actual Durations
Clear the Actual Durations for all exposures in the
proposal and reprocess the visit. For more on sub-exposures and the
Orbit Number/Actual Duration fields, see the training movie on
Sub-exposures.
Last modified: May 6, 2014.
![]() .
.
