INTRODUCTION TO THE APT INTERFACE FOR JWST
Overview
The APT user interface allows you to navigate through the various
tools in APT, with the choice of tools dependent upon the Observatory
(HST or JWST) of your observations; for a demonstration, see the
training
movie.
You may work on one or more
proposals during a session, although only one proposal may
be active at a time. The APT
user interface is composed of several different areas, each of which
provides distinct capabilities. The different areas can usually be expanded or
contracted by clicking on the area resizing triangles that appear in the area
borders or by dragging the borders.
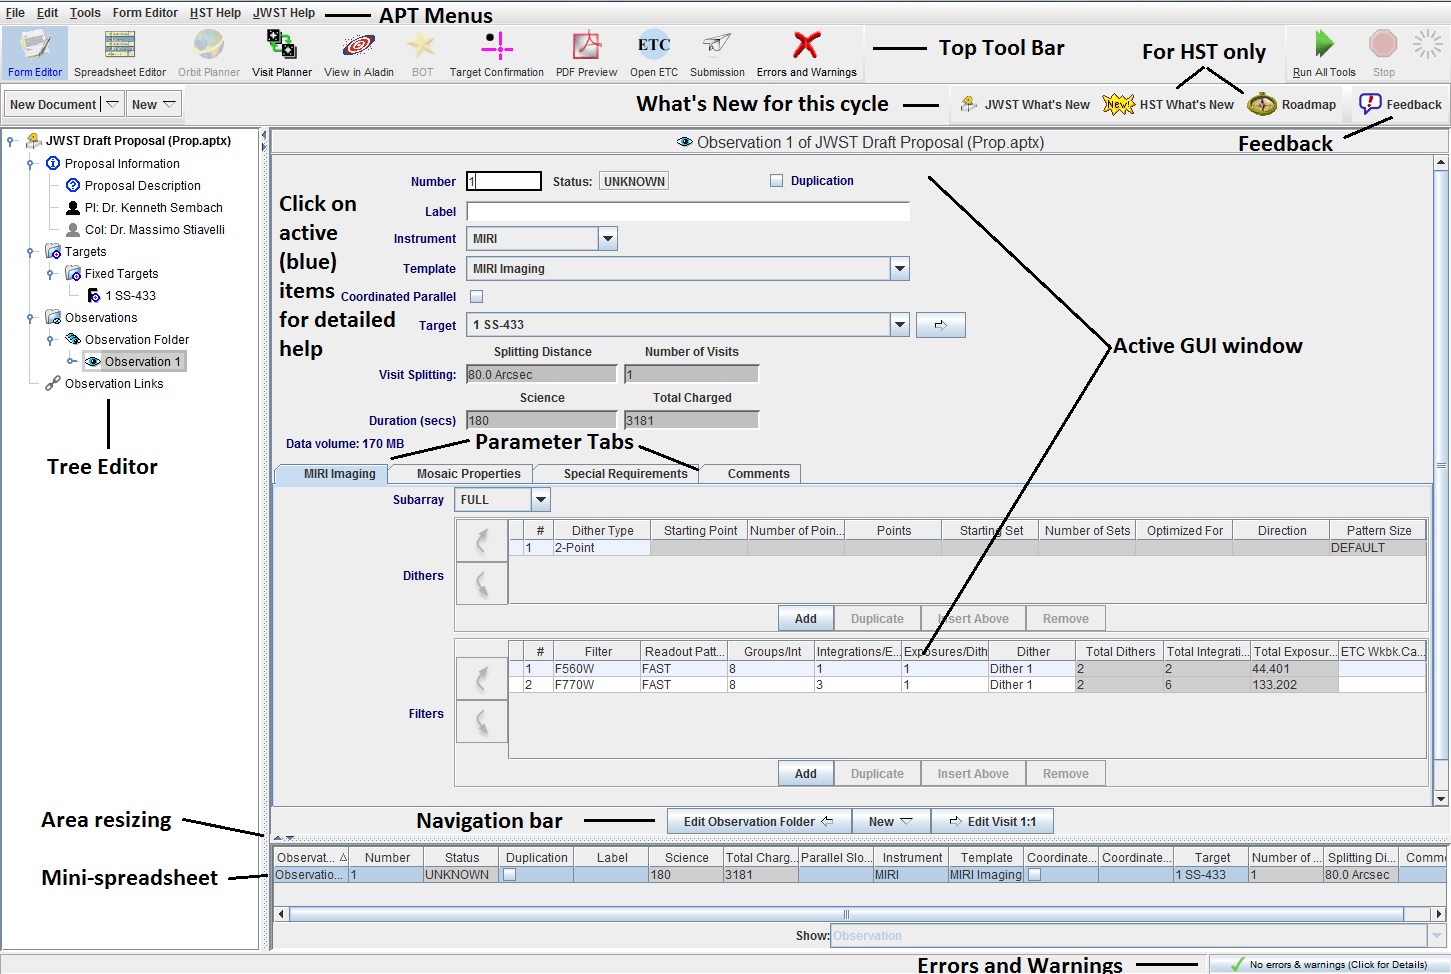
Definition of Interface Areas
There are six different areas to the APT interface:
- APT Menus - The uppermost portion of the interface consists of a series
of menus (File, Edit, Tools, Current Tool, and Help) for file
manipulation (e.g, saving the proposal), editing
parts of a proposal (e.g., deleting observations),
selecting a tool (e.g., the submission tool), selecting tool-specific
tasks (e.g. update display),
and help (e.g., access to the documentation). The Edit menu
handles changes to proposal elements, but not the text within
spreadsheets and forms (see Editors section below).
- Top Tool Bar - Just below the menus is a row of icons that can be
selected to invoke the various tools (such as the Form Editor and the
Submit tool) or operations (such as creating a new CoI). The
tools can also be selected from the tools menu.
The tools in the Top Tool Bar
consist of the following.
-
 Form Editor - the main proposal editing tool. It presents
a single proposal element in a form.
Form Editor - the main proposal editing tool. It presents
a single proposal element in a form.
-
 Spreadsheet Editor - an alternate editing tool that is not
very useful for JWST.
Spreadsheet Editor - an alternate editing tool that is not
very useful for JWST.
-
 Orbit Planner - for HST only.
-
 Visit Planner (VP) - checks and displays
constraints on a proposal, and calculates observing windows
(see movie).
Visit Planner (VP) - checks and displays
constraints on a proposal, and calculates observing windows
(see movie).
-
 View in Aladin - displays exposure apertures against
an image of the sky. It is useful for target and/or coordinate
confirmation. Use of this tool is not mandatory, but
is good sanity check. (see movie)
View in Aladin - displays exposure apertures against
an image of the sky. It is useful for target and/or coordinate
confirmation. Use of this tool is not mandatory, but
is good sanity check. (see movie)
-
 Bright Object Tool (BOT) - for HST only.
-
 Target Confirmation - generates fixed target confirmation charts (including proper motion, if applicable)
-
 PDF Preview - provides views of the proposal in PDF and text formats.
-
 Open ETC - opens a browser window on the JWST ETC hompage.
-
 Errors and Warnings Summary - lists errors or warnings for the proposal
(see movie).
Errors and Warnings Summary - lists errors or warnings for the proposal
(see movie).
-
 Submission - sends proposal and associated files to STScI after
full processing.
Submission - sends proposal and associated files to STScI after
full processing.
-
 Run All Tools - for HST only.
-
 Stop - for HST only.
- Tree Editor - Along the left side of the
user interface is a window with a tree editor.
Within this area you can view, create, delete, and copy
elements of proposals (e.g., observations). Items listed in the
Tree Editor that are incompletely or improperly specified are
marked with a
 .
You can expand the tree by clicking on the
key symbol just to the left of the element name (which will now point
vertically). You specify the proposal element to be edited (in the
Form
Editor) by clicking on the element name (which
then becomes highlighted). Some tools, such as the
Spreadsheet
Editors, allow more than one proposal element to be selected for
editing. This selection is accomplished by holding down the Control
key and clicking on desired items. Contiguous items can be selected
by clicking on the first item and then by holding down the Shift key
and clicking on last item; see the movie on GUI editting tips for more
on using the Tree Editor.
.
You can expand the tree by clicking on the
key symbol just to the left of the element name (which will now point
vertically). You specify the proposal element to be edited (in the
Form
Editor) by clicking on the element name (which
then becomes highlighted). Some tools, such as the
Spreadsheet
Editors, allow more than one proposal element to be selected for
editing. This selection is accomplished by holding down the Control
key and clicking on desired items. Contiguous items can be selected
by clicking on the first item and then by holding down the Shift key
and clicking on last item; see the movie on GUI editting tips for more
on using the Tree Editor.
- Mini-Spreadsheet - Along the bottom of the interface is an
editor which displays the details of the proposal element selected for editing
in the Tree Editor. This capability is not very useful for JWST proposals,
and is closed by default. To open it, drag the bottom
border of the tool display area upwards.
The information in the Mini-Spreadsheet
can generally be edited directly by clicking on the desired field,
although in some cases a window will
pop up to allow entry of information (e.g., if the field can contain a
large amount of text, such as the abstract).
The Mini-Spreadsheet marks improper items by red
highlighting. Note that you can change the
order of the columns by placing the cursor on the column title and dragging
the entry, and the size of the columns by placing the cursor on the
right-hand boundary and dragging. A single click on the column title will
enable a sort mode for the column; subsequent clicks will sort in ascending
and descending order.
- Active GUI window - The central region of the interface is the
display area for the currently selected tool. When a tool is selected, it
operates on the element chosen in the Tree Editor. The
Form Editor
(and
Spreadsheet tools) play a
special role in that they each allow for editing any portion of a
proposal, apart from the PDF attachment. If no tool is selected,
the
Form Editor
will appear by default in the Active GUI window when you
select an item in the Tree Editor.
- Diagnostics Area - The lower right of the interface
displays the number of current errors and warnings. By clicking on this region,
you will get the Diagnostics Browser, which provides a detailed
description of all diagnostics in the proposal.
Navigation
To operate on a proposal item, you need to select the item from the
Tree Editor and select a tool to carry out the operation. For
example, if you want to view an element of a proposal in the
Form Editor, you should click on
that element in the Tree Editor and click on the
Form Editor
in the Top Tool Bar. The tools can
generally be run in any order (e.g., you can edit the observations of a
proposal before you fill in the Proposal Information).
The bottom of the
Form Editor display contains a navigation feature
which suggests possible steps that a user may want to carry
out next. The right arrow suggests a further step, the left arrow suggests a
prior step, and the triangle in the middle suggests the creation of a
new proposal item. All three are active buttons.
Editors
The main editor for the contents of a JWST proposal is the
Form Editor.
(The Tree Editor is mainly used for
selecting objects and viewing the overall structure of the
proposal.) The
Form Editor provides a vertical listing of the
information and marks incompletely or erroneously specified information with
a .
The APT editor check for syntax and correctness when
you enter values, and they limit selection lists to values that are
consistent with other entries (e.g., if you specific MIRI as your
instrument, you can only select MIRI filters).
You can cut, copy, etc. proposal elements that appear in the
Tree Editor (i.e., complete proposals, CoIs, and
Observations) through the Edit menu.
You can also cut, copy, etc. text involving the
forms through the Edit menu. Whether the Edit menu
operates on proposal elements in the Tree Editor
or text in the
Form Editor is determined
by the region that was last used (i.e., had last focus).
Alternatively, you can use control keys to cut, copy, and paste
items in the Tree Editor and text in the
Form Editor.
Again, the affected area (Active GUI window or Tree Editor) is
the one that was last used (i.e., the area
that has focus). The control keys for cut, copy, and paste
are Control-x, Control-c, and Control-v,
respectively for Linux, and Windows; and Command-x, Command-c,
or Command-v, respectively for Macintosh.
Displaying/Printing
The
PDF Preview tool displays the
complete proposal (information inputted to APT merged with the PDF
attachment) in two format. The first the version that the TAC will
use for evaluating the proposal, and shows a high-level summary of
the proposal along with the PDF attachment.
The second is an operational view that shows the details needed
to implementation your observations on the telescope.
The
PDF Preview display can be printed through the PDF viewer
or saved as a PDF file through the Export menu item in the File menu.
provides views of the proposal in PDF and text formats.
Help
There are three types of help
available in APT.
- If you keep the cursor over certain
items on the screen, you will
obtain a short description of that item
(tool tip).
- The Help menu provides access to documents relevant to proposal
preparation; currently only the What's New is available for JWST, but
that file has links to training materials.
- Context sensitive help (in the
Form Editor) provides help on a topic
of interest by displaying appropriate section(s) from the documentation.
Place the cursor on an active field (in blue), and click when the
cursor changes to
 .
.
Another useful source of information is the
APT FAQ and Knowledge Base.
Last modified: November 27, 2017.
 JWST What's New - provides a description of major new
features or changes for the cycle
JWST What's New - provides a description of major new
features or changes for the cycle HST What's New - provides a description of major new
features or changes for the cycle
HST What's New - provides a description of major new
features or changes for the cycle Roadmap - for HST only
 Feedback - presents a popup in which you can provide feedback about
APT. Please select the option to attach the loaded proposal
if the feedback would make more sense in the context of
your proposal.
Feedback - presents a popup in which you can provide feedback about
APT. Please select the option to attach the loaded proposal
if the feedback would make more sense in the context of
your proposal.