RUNNING THE BRIGHT OBJECT TOOL FOR COS
Overview
The Bright Object Tool (click here
to see the movie) allows you to check for any objects in the field of
view that could cause either health-and-safety concerns for the COS
detectors. The search size depends on the detector/aperture combination, and takes
into account possible mispointings by HST, or motions of the telescope as
part of the target acquisition process. The tool uses the color information
in the GSC2 catalog to determine an approximate spectral type for each object
in the field, and then determines the count rate based on
that type. Because the GSC2 only has 2 magnitudes (F and J), the derived
counts are based on some simplifying assumptions (i.e. all objects are main
sequence stars, no reddening), as well as other conservative assumptions
to compensate for the lack of multi-color data. The count rates
are compared against trigger limits to determine the status of each object.
Alternately, the tool can use the GALEX catalog (if data is available),
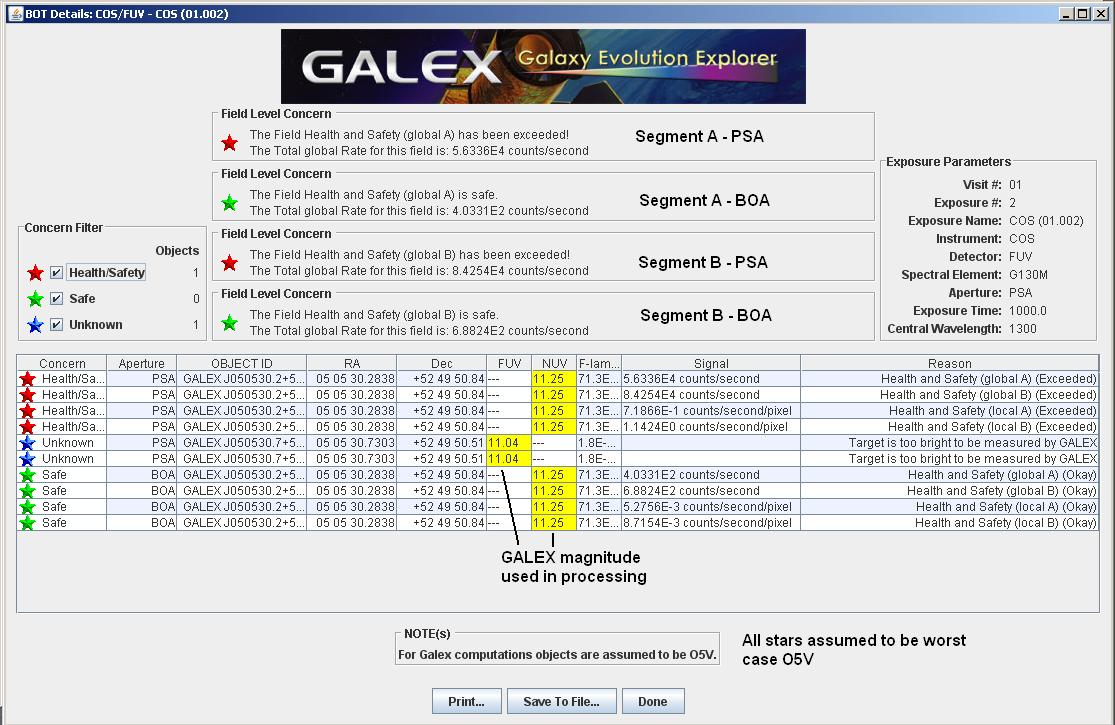
for which the tool assumes all objects are
worst-case O5 stars for processing. If you use the GALEX catalog for
your bright object checking, you will need to manually check that there is
complete GALEX coverage in your field. IF THERE IS GALEX DATA AVAILABLE,
YOU SHOULD USE THE GALEX CATALOG, as it gives a more accurate result
(since it is in the same bandpass as the UV detectors).
If your target has a proper motion provided, the tool can also be set to
take this motion into account when determining the area to be searched.
This tool should ONLY be used to check for field objects - the ETCs should
be used for the prime science target, since you know the true classification
(star, galaxy, QSO, etc) and reddening of the object.
There are 2 types of output from the tool. First, there is a tabular output,
which presents the data on each target (GSC2 or GALEX magnitudes, as well as
derived V and B-V, and spectral types for GSC2), the derived count rates,
and the status of each check performed (e.g. local
rate check). Second, the data can be viewed graphically using
the Aladin interface, which will allow you to see which stars are
causing problems.
Before initiating the Bright Object Tool,
you should select the exposure(s) you wish to process. You
can select your exposure(s) by either selecting the individual
 exposure or group of exposures in
the hierarchical editor. If
you wish to process an entire visit, you can select the
exposure or group of exposures in
the hierarchical editor. If
you wish to process an entire visit, you can select the
 Visit
container, and if you wish to process the entire proposal, select
the
Visit
container, and if you wish to process the entire proposal, select
the  Visits container.
Then select the Bright Object Tool button at the top of the
display, which will initialize the tool.
Visits container.
Then select the Bright Object Tool button at the top of the
display, which will initialize the tool.
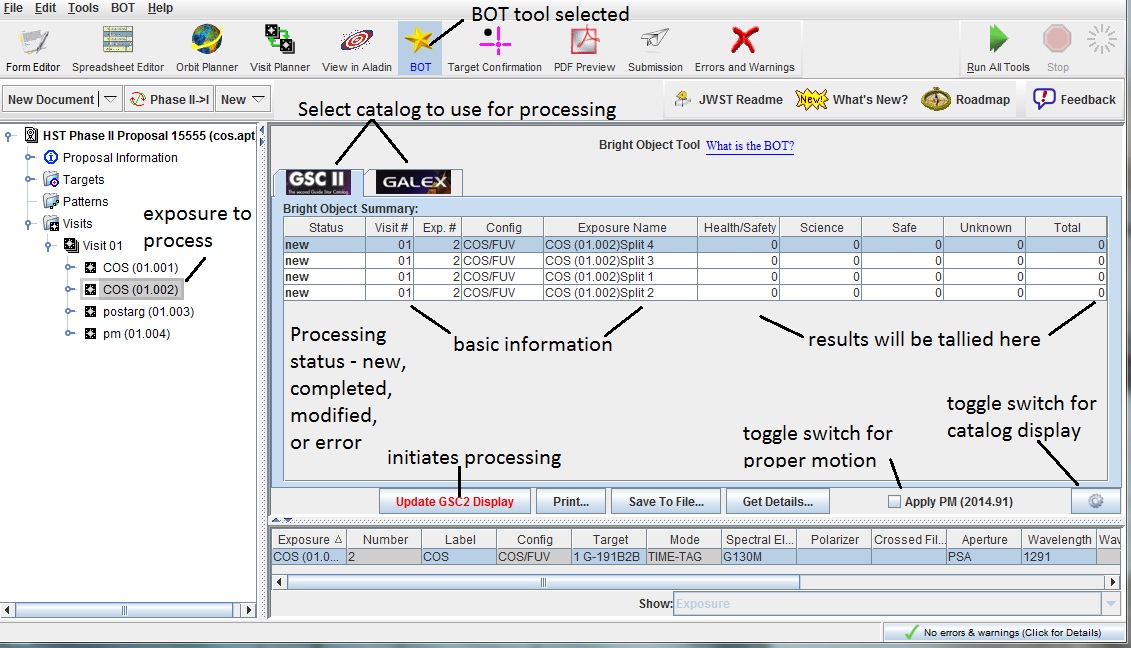
Note that the Update Display button is active (and red) - this
indicates that the display is out of date - and the Status field
is New. After processing, the number of stars in each category will
be populated.
The 4 categories of stars are:
Health/Safety - objects above the trigger limits and are NOT SAFE to observe
Science - objects that are safe to observe, but could cause a
degradation of the science (e.g. saturation); this is not
relevant for COS
Unknown - objects that do not have complete color information,
and therefore cannot be processed
Safe - objects that are safe to observe
Processing the exposure
To process the exposure(s), hit the Update Display button. During
processing, the screen grays out, and the
 Progress Wheel spins. When complete, the high-level
summary information is displayed, the status field says "completed",
the number of stars in each category is filled in, and the
Update Display button is gray (indicating processing is up-to-date).
If the exposure information was incomplete, or the exposure used a mode
not supported by the tool, the Status field will give an appropriate error
message.
If you modify your exposure after processing, the Status field will say
Modified.
If multiple exposures were processed, each would have its own summary
line.
Progress Wheel spins. When complete, the high-level
summary information is displayed, the status field says "completed",
the number of stars in each category is filled in, and the
Update Display button is gray (indicating processing is up-to-date).
If the exposure information was incomplete, or the exposure used a mode
not supported by the tool, the Status field will give an appropriate error
message.
If you modify your exposure after processing, the Status field will say
Modified.
If multiple exposures were processed, each would have its own summary
line.
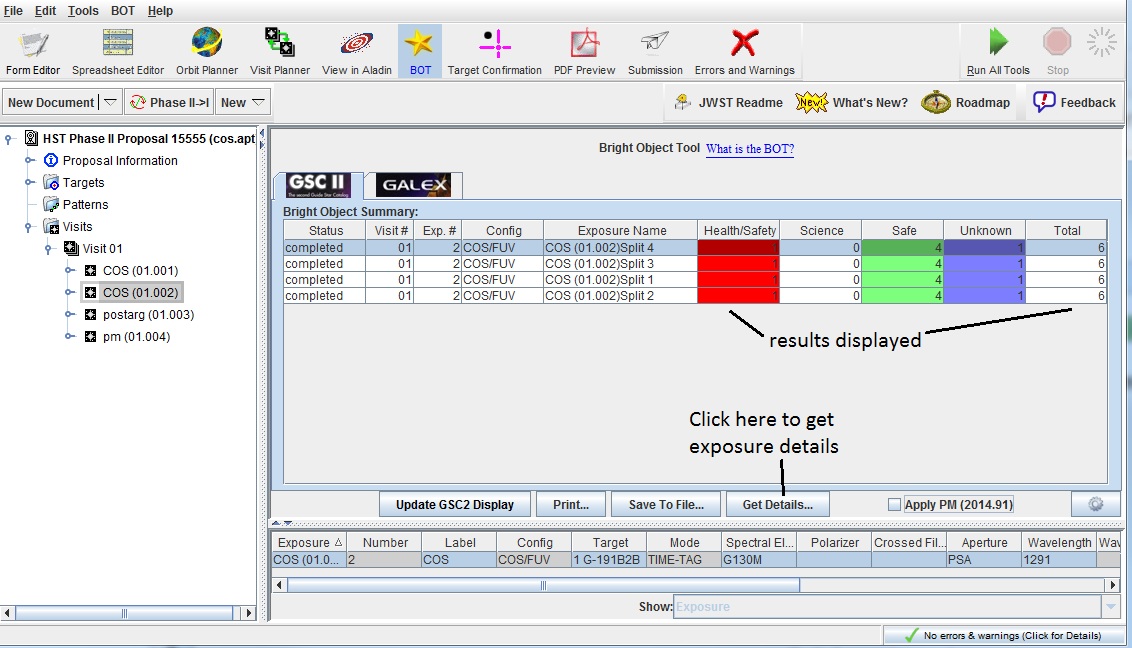
Reviewing the results
To view the results of an exposure, select it in the BOT display and
click on the Get Details button. This will bring up a detailed results
page for the exposure, where you will see the data for each object;
note that you can have multiple tables up at the same time to facilitate
comparisons.
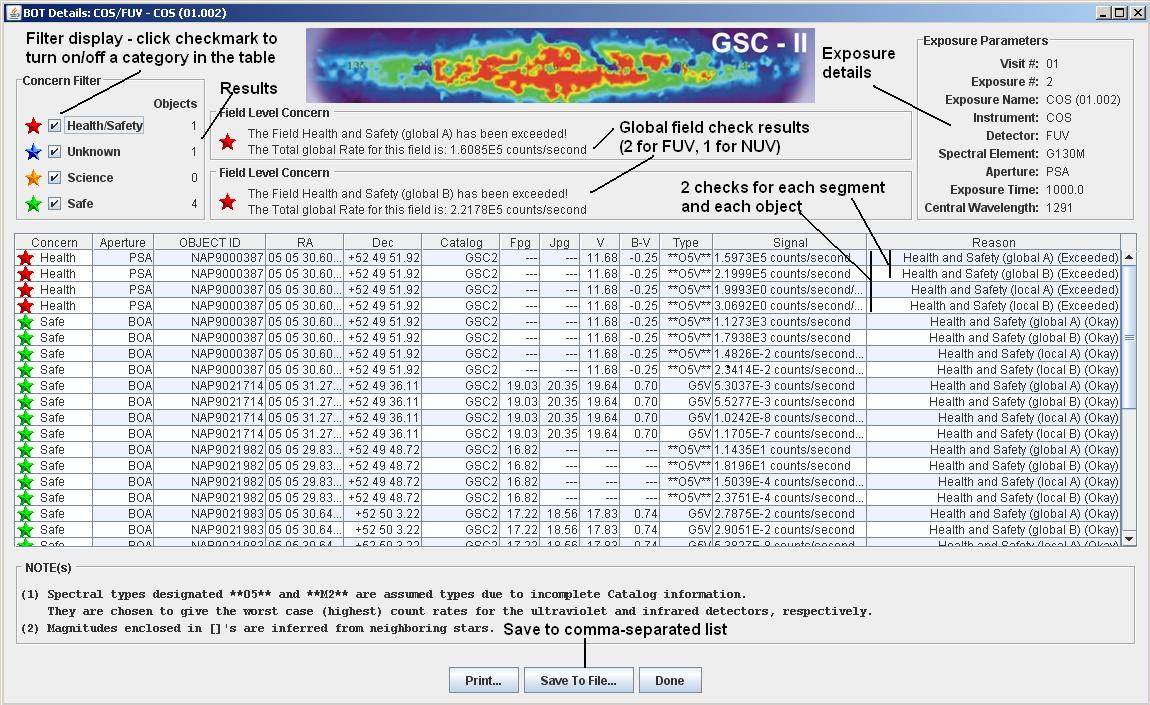
The number of checks per star varies according to the detector used, and
where the star falls in the field. For the NUV, there are 2 checks per star
(local and global limit), while the FUV has 4 checks (a pair for each segment,
except for the G140L/1105).
Additionally, COS obtains data in both apertures for all exposures, and since
there is some overlap in the search regions, some stars are processed through
both apertures. So, for the NUV, there are either 2 or 4 checks per star, and
for the FUV, there are either 4 or 8 checks.
When categorizing
the stars, the worst category is used (e.g. if a star is Safe for the
global (total count rate) check, but Health for the local (brightest
pixel) check, the object is categorized
as Health). You can also sort the table on any column by clicking on
the column header.
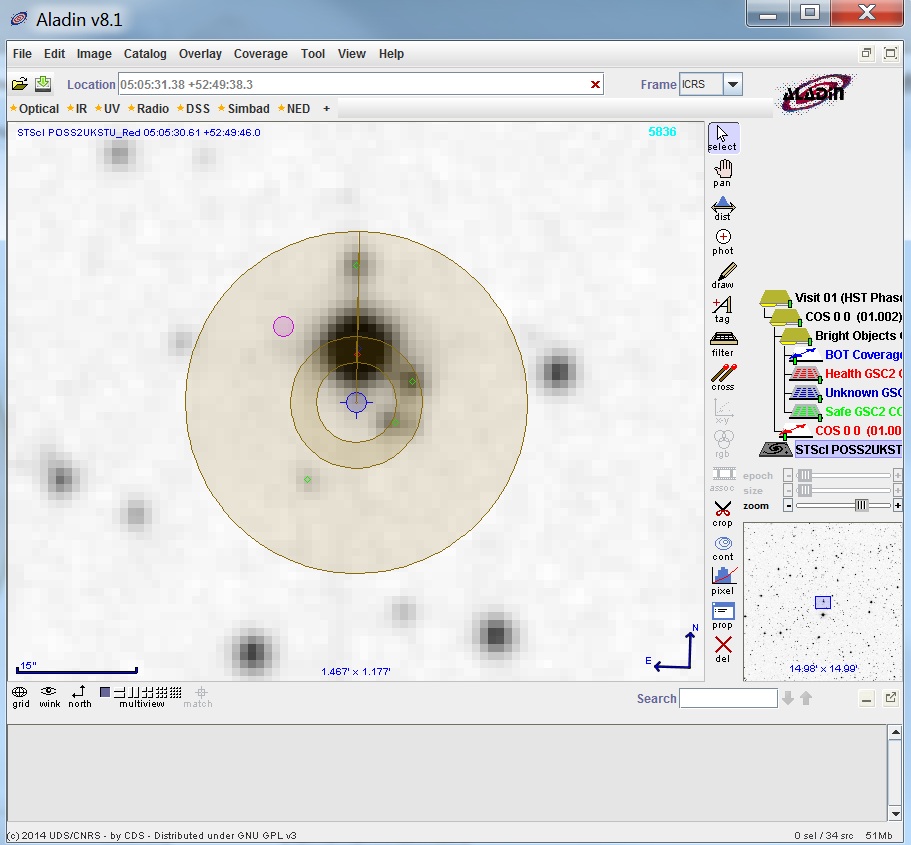
To view the results graphically, select the exposure(s) in
the hierarchical editor and select the Aladin tool. This will bring
up the Aladin window, and the Bright Object overlay will be displayed.
Use the Zoom feature to make the objects visible, and open the
folders in the Aladin tree to see the individual planes.
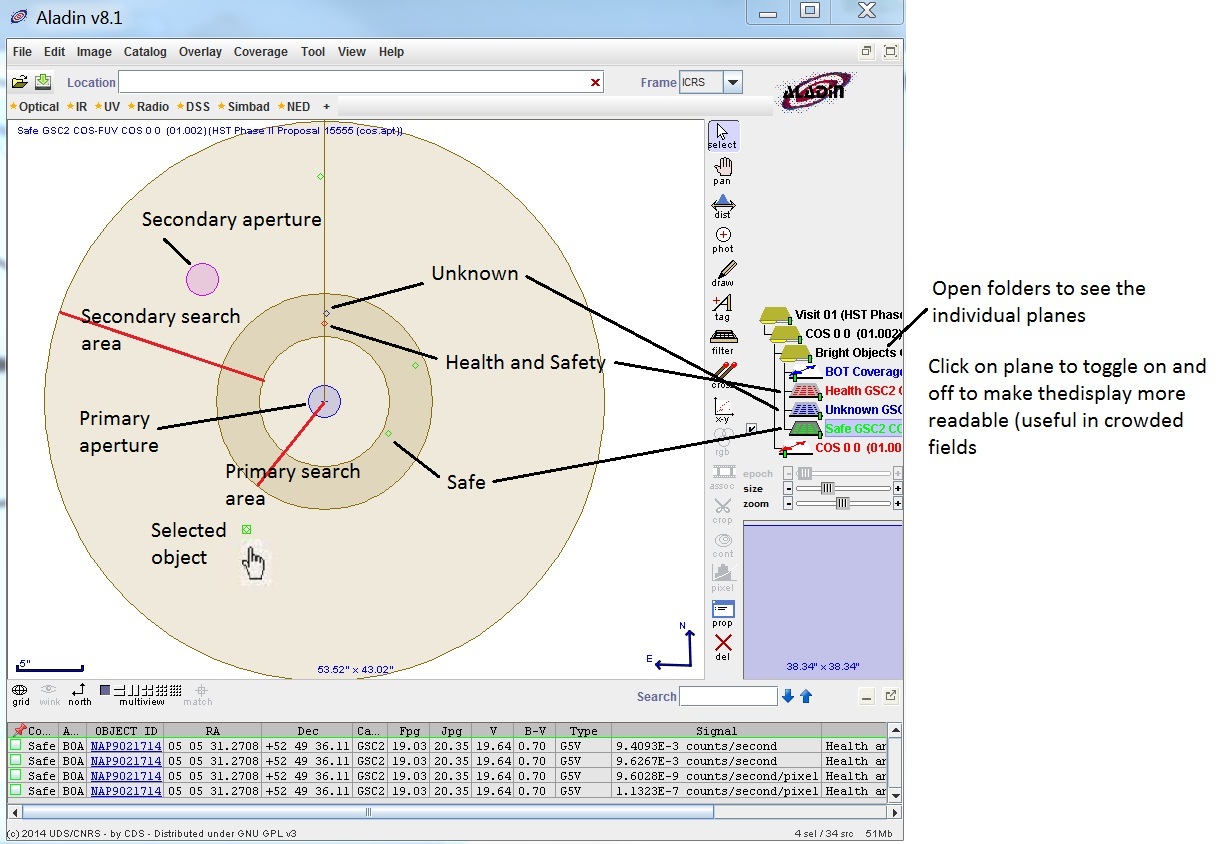
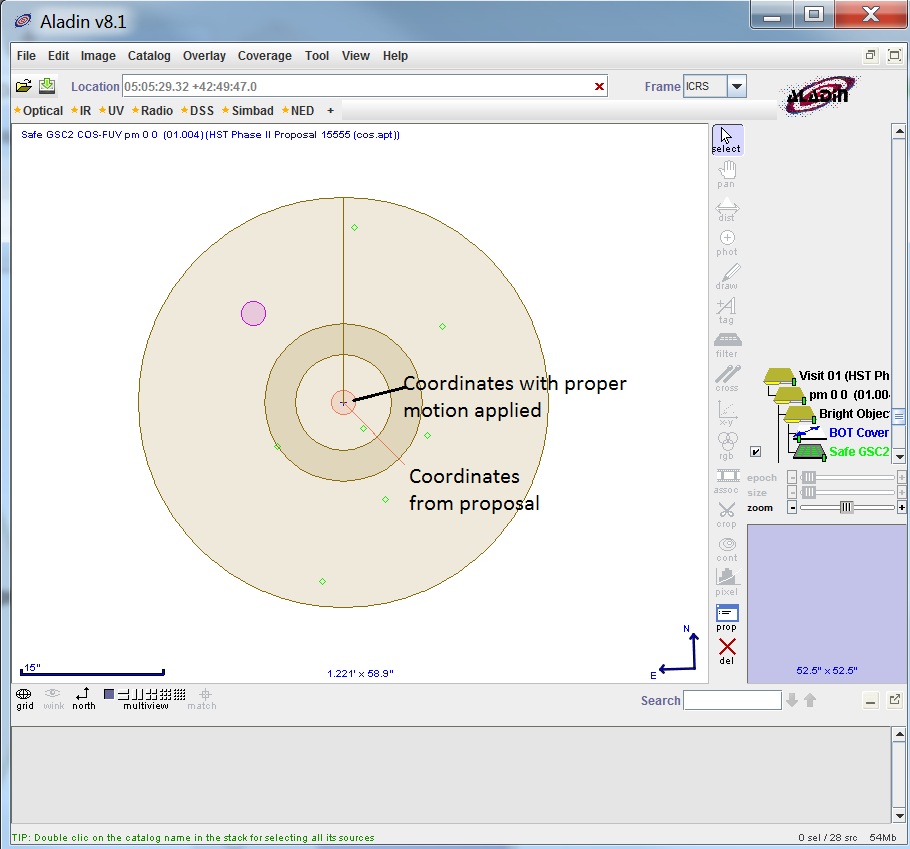
The search area for the primary aperture (in this case the PSA aperture) is a
circle centered on the aperture extended out to the middle ring in the figure.
The search area for the secondary aperture (in this case the BOA aperture) is
an annulus centered on the aperture, with a width from the inner to the outer
ring in the figure.
If you put your cursor on an object and click on it, the detailed result
for that star is displayed in the bottom spreadsheet; this is the same
information that was available in the tabular view. If you want to
look at multiple objects at one time, make a box
that includes the object of interest. If you put your cursor on the record
in the spreadsheet, the corresponding star in the Aladin display will
flash (and vice versa).
You can overlay a DSS image on the BOT overlay by clicking
on the Load DSS button in the APT Aladin window.
You can also process COS exposures using the GALEX
catalog. In the BOT window, select the GALEX tab and process just like
with GSC2. In the detailed results window, the magnitudes used for the
GALEX processing is highlighted. The tool tries to use the FUV magnitude
for the COS/FUV detector and the NUV magnitude for
the COS/NUV detector. However, if the appropriate GALEX
magnitude is not available, the other will be used.
The Bright Object Tool also works for exposures that have a target
POS TARG position change. In this case,
the tool takes the standard
search radius and increases it by the size of the POS TARG motion.
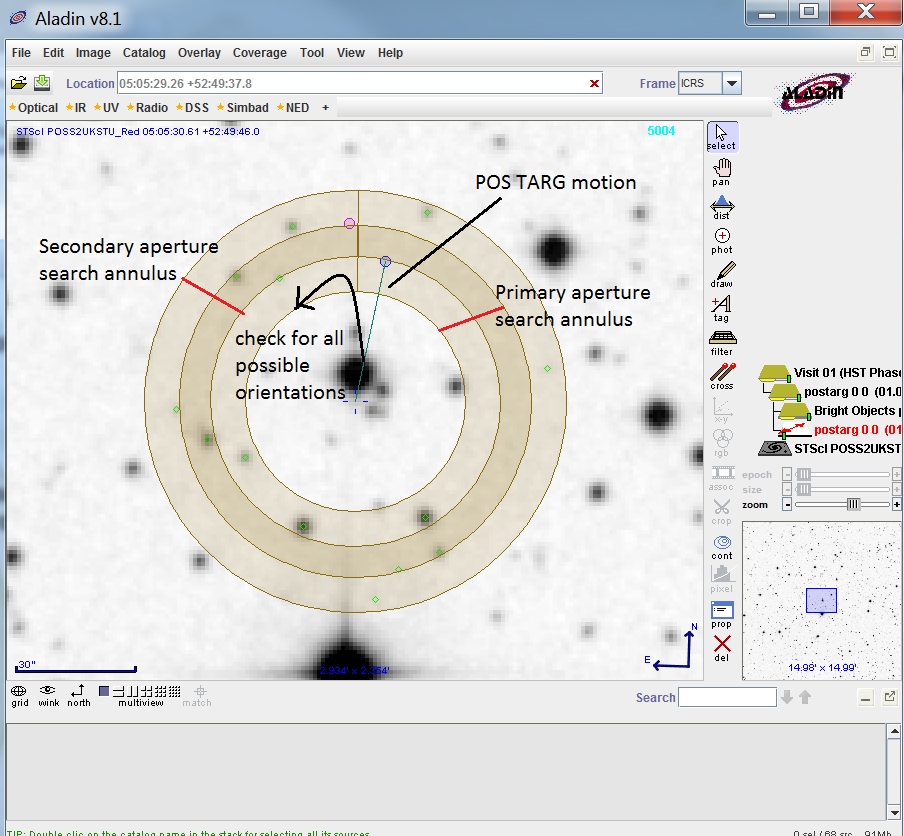
The POS TARG motion is clearly labelled, and many more objects are
checked than in the case of no POS TARG. This is because the tool
must check for all possible ORIENTations of HST, since the observation
did not specify a specific ORIENT for the exposure.
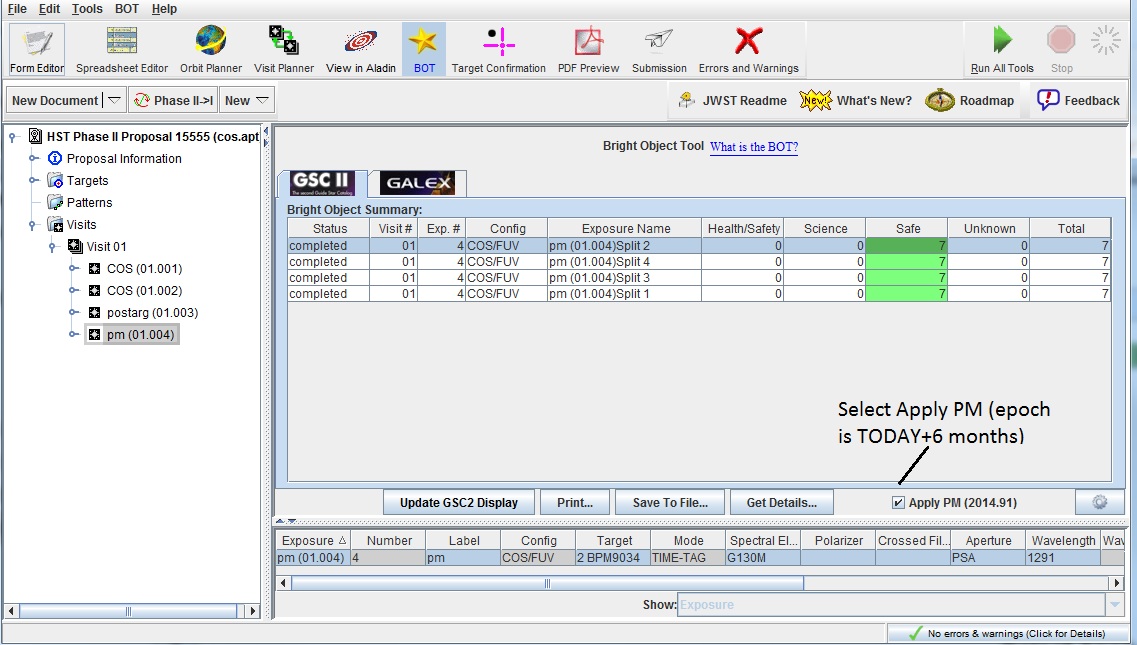
The BOT tool can also take proper motion into account (when specified
in the proposal). With the toggle set, the search area will be adjust
to account for proper motion from the epoch of the coordinates to an
epoch 6 months for today.
Last modified: June 2, 2014.